Back to Designer Page Linda Wyszynski's Heather
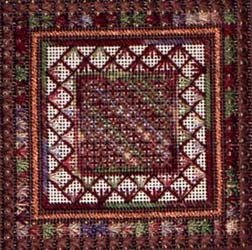
FREE PATTERN
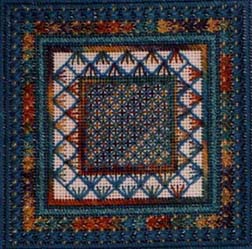
Color choice is a very personal thing everyone has a favorite color. Heather is a design that can be stitched in many different colors. Choose your thread in the following order: Watercolours, Floss, Medicis, Medium (16) Braid, Metallic Floss. The Watercolours should be the most dominant color. The Floss and Medicis color's should blend not overpower the Watercolours. When choosing your colored Braid stay in the same color family as your Medicis and/or Floss.
Color Suggestion:
Caron Watercolours - Tiffany Rose
DMC Floss Antique Violet Med. #3041
DMC Medicis Antique Mauve #8122
DMC Metallic Floss Silver #5283
Kreinik Medium #16 Braid Silver #001 and Pink #007
Material List
10" X 10" piece of 16-mesh Zweigart mono canvas, white
10" X 10" stretcher bar frame (optional)
22 & 26 Tapestry needles
DMC Floss - 3 skein
Caron Watercolours - 1 skein
DMC Medicis - 1 skein
DMC Metallic Floss gold or silver
Kreinik Medium (#16) Braid - 1 spool of silver or gold and 1 spool that blends with your WatercoloursGeneral Information
Design 5.5 X 5.5
Stitches: 80 X 801. Watercolours clip the knot only - do not cut into lengths. Separate 1 strand at a time from the skein. Put a knot in one end so you will know which end to cut from. As needed cut a 16'- 18' length from the end without the knot. You will be using the Watercolours (as it comes from the skein unless other wise noted in the instructions.
2. Use two strands of the Metallic Floss
3. Always count threads not holes unless other wise noted in the directions.
4. Use your #22 Tapestry needle for all stitching except when stitching with the Metallic Floss use the #26 Tapestry needle.
5. The placement chart will show you where each stitch is placed.
6. The Pattern diagram will show you how to work the stitch. Carefully follow the arrows, numbers and letters.
7 .You will need to refer to the top of your canvas as you stitch, mark it with a T.
8. Use an away waste knot to anchor your beginning stitch using the following directions:
A. Tie a knot in your thread.
B. Go 3 inches away from the area you are working and put the needle through the front side of your canvas. Note: the knot will be on the front side of the canvas.
C. Coming up with your needle and thread from the underside begin stitching as you normally would.
D. When stitching is complete secure your thread on the back. Clip the waste knot on the right side of the canvas and weave the thread under the stitching on the backside to secure.
Stitching HeatherSecure the canvas to the stretcher bars.
Start in the upper left corner of your canvas measure 3 inches over and 3 inches down mark this point with a pin. Starting from this point count over to the right 25 threads and down 25 threads, mark this thread a pin, this will be your starting point
Continental
Large X Cross -Trip 1
Upright -Trip 2
Small Upright Cross -Trip 3
AREA 1
The center of the design is done in 3 Trips and is bordered by the Continental.
Use:DMC Floss - 4 strands for Trip 1
DMC Metallic Floss - Trip 2
Caron Watercolours - 1 strand for Trip 3Step A
Trip 1: Using floss begin stitching the Large X Cross at your marked staring point.You will be working 7 rows of 7 Large X Cross's. Work one row at a time, working one half the cross to the right then working to the left to finish the row of cross's. Make sure all your Large X Cross's are crossed the same way!
Trip 2: Using Metallic Floss place an Upright stitch in the center of each Large X Cross start on the left working to the right. Be sure your thread is secure, this thread is slippery.
Trip 3: The Small Upright Cross is worked diagonally using Watercolours.You will be starting in the upper left corner, between the Large X Cross traveling downward filling in between the Large X Cross with the Small Upright Cross.Working alternately down a row and then up a row until you have filled in between each of the Large X Cross. Each time you thread your needle with the Watercolours use the opposite end of the thread used previously. This will give more variation in color. Be sure not to pull your thread too tight.Use the Watercolours this way only in this section.
Step B
The Continental completes the center section.
Use:Caron Watercolours -1 strand for 1 & 2
1. Stitch 2 Continental stitches in between each of the Large X Cross around outside.
2.Starting on the upper right side stitch two rows of Continental just above the Large X Cross. Note the Continental will be sharing holes with the Large X Cross and the Continental fill in stitches.
AREA 2
This section is worked in 2 trips.
Use:DMC Medicis - 2 strands for Trip 1
Caron Watercolours - 1 strand for Trip 2
Trip 1: Row 1 and 2 - Start in the lower left corner under the Large X Cross stitching the Open Weave V using Medicis. (Work all four sides.) You will work this in two rows. Notice on the pattern chart that the second row has an added stitch to put you in the correct place to start the second row. You may want to turn your canvas as you stitch each side.
Trip 2: Fill in the stitches within the V on this trip using Watercolours. Start in the lower left just under the Continental, the top of your fill in stitch will share a hole with the Continental (first row only). Since this stitch is open it is easy to let your back thread show on the front side as you travel from one V to the next. To keep this from happening you will need to wrap your thread over and under the Medicis on the back side of canvas working up one side of the V and down the other as you travel from one V to the next V. You will be able to place your stitches within the V's using this method without your traveling thread being see from the front. Count your threads carefully making sure you are on the same horizontal thread within each of the V's. Note: you will be sharing the same base hole for all three stitches within the V.
Open Weave - Trip 1
Open Weave - Trip 2
Open Weave - Trip 3
AREA 3This section has 4 Rows that border the center design. Reminder: Be sure to check the placement chart before you begin each row to make sure you are in the correct starting place.
Use:Caron Watercolours -1 strand
DMC floss - 4 strands for Row 2 & 4
Kreinik Medium (#16) Braid that blends with the Watercolours -1 strand Row 3
Row 1. Stitch one row of the Slanted Goblin using Watercolours. To start find the center V on the top row of the Open Weave V. You will be working just above the Open Weave V sharing holes with this stitch. Start working to the left and continue all the way around the center design. Note: you will have 1 Slanted Goblin stitch on two corners that is over 3 thread instead of 2 threads and 1 stitch over 1 thread instead of 2 threads.
Row 2. Stitch one row of Continental stitch starting in the upper right just above Row 1 using floss.Work all four sides.
Row 3. Stitch one row of Slanted Goblin starting in the upper right just above Row 2 using Medium (#16) Braid that blends with the Watercolours. Work all four sides.
Row 4. Stitch one row of the Continental starting in the upper right just above Row 3 using Floss.Work all four sides.
Slanted Goblin
AREA 4
There are 3 Rows in this section. You will be starting with a basic cross stitch and filling in with stitches worked at right and left angles, finishing with a stitch across the top.
Use: Caron Watercolours - 1 strand for Row 1
DMC Floss - 6 strands for Row 2
DMC Floss - 4 strands for Row 3
Rapid
Step A
Row 1. Using Watercolours stitch 1 row of the Rapid stitch starting in the lower left just below the Continental (Row 4 in section 4). Work all four sides.
Row 2. Using DMC floss stitch 1 row of the Rapid stitch starting in the lower left just below Row 1.Work all four sides.
Row 3. Using DMC floss stitch 1 row of Slanted Goblin starting in the upper right just above Row 2. Work all four sides.Note: It is sometimes helpful to your finisher or framer to have an extra row of stitching. You can add an additional row of Slanted Goblin if you wish.
Upright
Step B
You will be filling in the "sparkle" in this step.
USE:Kreinik Medium (#16) Braid silver or gold - 1 strand
When the Rapid stitch is worked it leaves a small area of exposed canvas on each side, you will be filling in that area with the Upright stitch (over one thread). Fill in the blank canvas areas starting in the lower right corner working to the left, until you have fill in between and to the outside of both rows of the Rapid stitch. Do not pull the Braid tight leave it a little loose.
Finishing Suggestions:
This design is suitable for a frame, tote bag insert, pillow insert, Sudberry House tray or box.Heather Placement Chart
COPYRIGHT NOTICE: None of these designs or instructions can be reproduced or distributed in any form (including electronic) without the prior written permission of Linda Wyszynski. Visitors are granted one time usage rights to print out the designs for their own personal use.
(Back to Designer Feature)