Students will each need:
20 count Luguana (White, Antique White, or Cream) cut in 9 in
squares
Half a skein of Wildflowers by the Caron Collection
2 or 3 half skeins of 6 strand embroidery floss that compliment
the Wildflowers
Half a skein of Krenik Metallic Braid (Number 4 or 8) that compliments
Wildflowers
Half a packet of Mill Hill Seed Beads that compliments Wildflowers
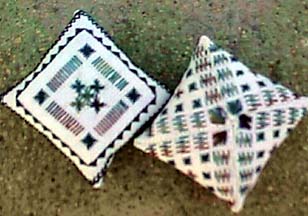
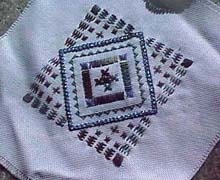
Once most of the students have learned most of the stitches,
we begin the ornament. I pass out the fabric and a chart with
only the center motif. As students complete a section, I give
them the next section of the pattern. We discuss ways to find
the center of the fabric. We then discuss how the middle Leviathan
crosses over the center of the pattern and ways to start.
Step One: Five Leviathans with one strand of Wildflowers
.
Step Two: Four Diamond Rhodes with 1 or 2 strands of 6-strand
embroidery floss. We talk about how you would use the Leviathans
to find where the Rhodes are placed.
Step Three: Diagonal Stitches with one strand of Wildflowers.
Step Four: 1/2 Square Eyelets using 1 or 2 strands of
6-strand embroidery floss.
Step Five: Upright Crosses using the Kreinik Metallic.
Step Six: Backstitch using 1 or 2 strands of 6-strand
embroidery floss.
Step Seven: Pattern Darning and Shell Stitch using 1 strand
of Wildflowers. If a student has made an error that I haven't
caught I have him/her do the shell stitch first (follow the lines
out from the top of the Upright crosses at points to find placement
of Shell stitch), then do the pattern darning to "fit".
Step Eight: Square Rhodes stitches using 1 or 2 strands of
6-strand embroidery floss.
Step Nine: Leviathan stitches using 1 or 2 strands of
6-strand embroidery floss.
Step Ten: Beads on tips of Leviathans in the Center Motif
Step Eleven: Finish ornament according to directions for
finishing ornaments in the Color Auras pattern. Some students
decide they do not want to make the pattern into an ornament
but want to frame their project instead.
I do LOTS of checking on each and every step. I have found
it's easier to catch mistakes as young stitchers hate to rip
out mistakes! (Don't we all!) If you catch it early they have
less to take out and put back in. Often students will let me
rip out a mistake and then they will redo it. I don't force them
to correct their mistakes, rather, I encourage them.
I don't let them work on their projects at home. They are
still learning and make mistakes. A lot of mistakes are made
when students want to count holes, not threads.
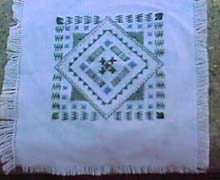
Ways Students Have Modified
the Ornament:
Threads:
I have students choose what color of 6-strand floss they are
going to use. Even with having partners for choosing colors,
no two ornaments end up looking the same. When I designed and
first taught the project, every time I used 6-strand floss I
used 2 strands. Students began using different numbers of strands
with great results. The next thing they began doing is using
2 strands but each strand would be of a different color. This
adds a really unique dimension to the project. Most of my students
do this somewhere in the project and they all love it. Some students
have not liked using the metallic and replace it with 6-strand
floss. Some students have done each of the corners in different
colors; some have made each of the two sets of opposing corners
in the same color scheme.
Beads:
I designed the ornament using beads only in the center motif
on the tips of the 5 Leviathans. Some students don't want to
use beads by the time we finish; others want to put beads everywhere.
Some of the most popular and recurring spots are Leviathan and
Rhodes in the corners (points of stitches) and points on 1/2
square eyelets.
Stitches:
1. Students have replaced the Diamond Rhodes with Leviathans
in the center motif. (I have also suggested this for students
who are having a difficult time learning the Diamond Rhodes.)
2. A student used a giant half diamond eyelet in place of the
Leviathans in the corners.
3. A student used square eyelets (Algerian eyelet) in place of
the Rhodes in the corners.
4. One student decided she wasn't going to make an ornament and
didn't want to do the corners, instead she continued making new
bands (one was diagonal stitches around the backstitched upright
crosses).
5. Some students will make a "mistake" and decide not
to correct the mistake. We discuss how they can modify the pattern
to incorporate what they have done.
I have taught this class 8 times. I am beginning the 1999-2000
school year on August 30. I will be again teaching Home Basics/Introduction
to Needlework for a 6th grade exploratory class. Last year several
students asked if I taught an advanced class for 7th and 8th
graders. I proposed the idea to the administration and was given
the go ahead last spring. I will be teaching this class during
the spring semester .
If you have any questions or comments please feel free to
contact me via email at [email protected]
COPYRIGHT NOTICE: None of these designs
or instructions can be reproduced or distributed in any form
(including electronic) without the prior written permission of
Sara Pittenger.
ONLINE
CLASS ARCHIVES
Click below if you missed any of our past classes.
Alium by Terri Hazlett
Holiday
Snow by Designed by Carolyn
Mitchell
Basic
Drawstring Pouch Pattern by Tanya Ilnicki
Horizons
Part II, by
Rosalyn K. Watnemo
Horizons Part I
by Rosalyn K. Watnemo
Tulip
Trio taught by Tisha Kuntz and
Carolyn Hotchkiss of Too Sisters Designs
Hyacinth Hearts Brooch taught by Susan Albury
Amy's Recipe for a Garden
Maze Bag
Six-Pointed Star An Online
Class by Lois Caron
Christmas
Sampler by Giulia Manfredini, Italy (Part
I) (Part
II),
Part
I of Christmas Sampler Class by Giulia
Manfredini's
"Double Straight Cross
Stitch" by Ann Caswell of Kaz
Designs
"Crazy
Quilt Patchwork Block"
(in 2 parts) by Leslie Levison
AUTUMNAL
SCENTIMENT (in 3 parts) by Anthony
Minieri
Teneriffe Embroidery by Norma Wendt of Idle Time Designs
Damselfy Sampler
Class taught by Karen Cohn
Border
Design taught by Mary D. Shipp of Stitches
by Shipp
Fun with the Woven
Stitch taught by Ann Caswell
Using
Variegated Threads for Dramatic Effects
taught by Lois Caron