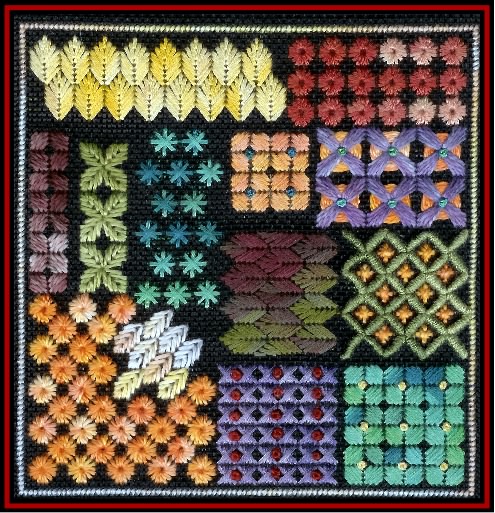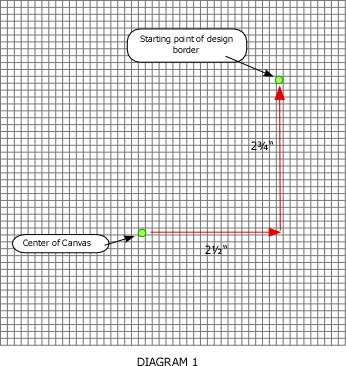
2. Follow the Right Side master chart and begin at the top
right hand side of the design. You will use Thread #1. This is
a 12-ply silk. You will be using 4 ply of the thread. Stitch
the series of eyelets as shown in the diagram below. Come up
at the numbers and down in the "X" hole. (diagram 2)
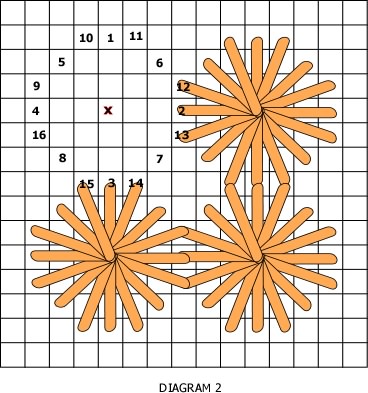
3. Move to the left and stitch the leaf shapes using Thread
#2. This is a 12-ply silk and you will use 4 ply of this thread.
Find the location of the rows of leaves by using your master
charts. Follow the diagram for the stitch sequence. (diagram
3)
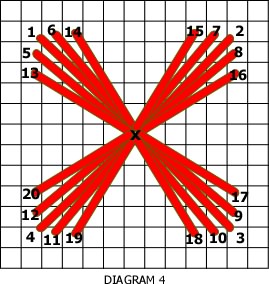
4. Move to the right side of the design in order to stitch
the Eyelet variation with the background coils. Locate the positioning
of these stitches using your master charts. Next, using one ply
of Thread #3 follow the diagram below for the first step. Come
up at the numbers and down at the "X". (diagram 4)
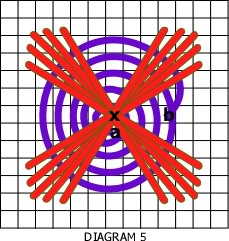
5. With Thread #4, using one ply, come up at the "a"
mark and coil your thread around the center of the eyelet under
the stitches you placed in step 4. Complete 4-5 tight coils and
bring your needle down at the "b" mark. As you coil
your thread, make sure you lay the thread alongside the previous
coil. You don't want to have any build up of threads under the
eyelet. (diagram 5)
6. Your last step is to form a French Knot (double wrap) at
the center of the eyelet ("x"), using 4 ply of Thread
#5.
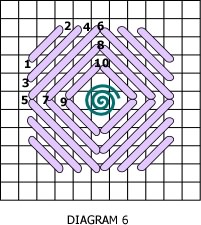
7. Moving left you come to four cushion stitches with a French
Knot in the center of each one. Use 4 ply of Thread #7 and follow
the diagram below for the cushion stitches. Next using 4 ply
of Thread #5, place a French Knot (double wrap) in the center
of the cushions. (diagram 6)
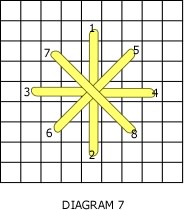
8. Left of step #6 stitch the group of double cross stitches.
Use 4 ply of Thread #5 Follow the numbers on the diagram. (diagram
7)
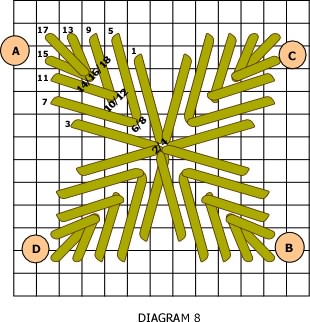
9. Next stitch the combination of leaf stitches forming a
square. These are done with one ply of Thread #8. Work the leaves
in the sequence shown by the letters next to each leaf. (diagram
8)
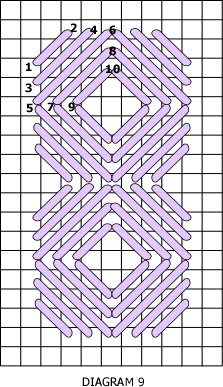
10. Moving to the left, stitch the four cushion stitches at
the edge of the design. Use one ply of Thread # 9 for these stitches.
(diagram 9)
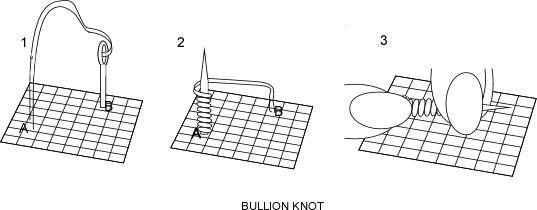
11. Moving back to the right side of the design, stitch the
combination of Bullion Knots and double cross stitches. Begin
with the Bullion Knots using 4 ply of Thread # 6. The Bullion
Knots are done diagonally over 4 intersections. You should have
approximately 12 wraps on your needle for each Bullion Knot.
The diagram shows the sequence of the Bullion Knots. (Bullion
Knot diagram and diagram 10)
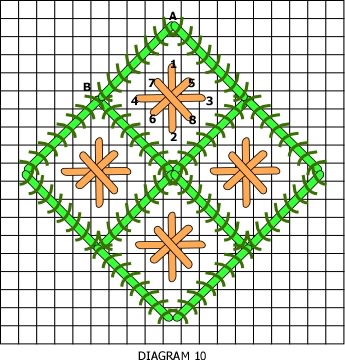
12. Inside each diamond formed by the Bullion Knots place
a double cross stitch using one ply of Thread #4.
13. Moving to the left, stitch the group of leaf stitches.
They are identical to those in step 3 but are placed horizontally.
Use 4 ply of Thread # 10. Use diagram 3 for the stitch.
14. Moving on to the bottom right corner of the design, stitch
nine cushion stitches identical to those in step 6. Use 4 ply
of Thread # 5 for the cushions and 4 ply of Thread # 2 for the
French Knot (double wrap) in the center of each cushion stitch.
See diagram 6.
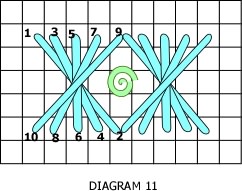
15. To the left of the cushion stitches you will stitch six
rows of half Rhodes, six in each row. Use 4 ply of Thread #12
for the Rhodes. Place a French Knot (double wrap), at location
shown on the master chart using one ply of Thread #13. (diagram
11)
16. At the bottom left corner of the design you will stitch
a group of eyelets identical to those you stitched in step 2.
Use one ply of Thread #4. Use diagram 2 for the stitch.
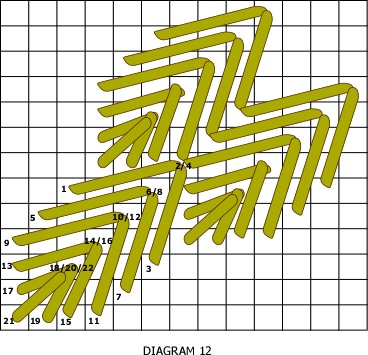
17. At the top right corner of the group of eyelets you just
completed, stitch a group of diagonal leaves using one ply of
Thread #12. Follow the diagram for the leaves. Work the leaves
from the bottom left leaf in the group to the back. (diagram
12)
18. Complete your piece by stitching a border around the entire
design using one ply of Thread #12. The border is a Gobelin stitch
over one intersection.
© 2006, Orna Willis- Permission
is granted to reproduce for personal use only by Orna Willis.
These charts cannot be reproduced, electronically or otherwise,
or sold without the express written permission of Orna Willis.
(To do so is a violation of the copyright laws).