| Dyed and Gone to Heaven – An Online Magazine and Needlework Resource |
|
 |
Hints on Counted Cross Stitch
(Excerpted with permission from "How to Embroider" Vol. IV, published by the National Needlework Association/TNNA)
Links to other needlework tips
Rules of the Trade for Embroidery
Cross stitching with Variegated Threads.
Reading Stitch ChartsCounted cross stitch is the most popular form of embroidery in the United States today. It's widely accepted because it's easy. and it offers such an exciting array of project design books. Here are some tips if you are just beginning.
Design Charts
Design charts for counted cross projects are drawn of graph paper, usually 10-square-per-inch, because it's easy to read. Each square on the chart represents a square on the fabric, and the stitcher counts the squares to transfer the design to an evenweave fabric. Diagram 40
The design can be stitched on any size evenweave, but the size of the finished design will vary according to the count of the fabric. Most commmercial patterns will tell you the exact size of your finished design. However, if you are designing your own, the following formula will help you to determine how large or small your design will be.
Determining the Width and Height of Your Design Area in Inches.
Divide the number of symbol squares in the width of your design chart (literally count the number of symbol squares across the widest point of the chart, do not count the squares that are outside of the design) by the count of your fabric (the number of threads per inch). This will equal the width of your finished design area in inches.
Then divide the number of symbol squares in the height of your design chart by the count of your fabric. This will equal the height of your finished design in inches.
For example:
If you have a chart that is 28 squares high and 42 squares wide and you are going to embroider the design onto 14 count Aida, the formula would be:
28 squares ÷ 14 count = 2 inches high
42 squares ÷ 14 count = 3 inches wide
You will need to use this formula to determine how much fabric to buy if you change the count of the fabric recommended in the pattern instructions, or if there is no fabric count indicated. Just remember to add enough fabric to all sides of your design area for finishing, usually 4 to 6 inches to each edge.
There are a variety of symbols which appear in the squares of the chart. These symbols are keyed to a color chart and tell you what color floss to use. The written instructions tell you what stitch to use. A symbol, usually an arrow, will indicate where the center of the chart is located. It is from this center point that you begin to count out your design. If no such point is indicated, follow the guidelines below.
Finding the Center of a Chart
To determine the center of a chart:
- First, count the number of squares across the design from one edge to the other. Divide in half; this is the vertical center. Now count from top to bottom. Again, divide in half; this is the horizontal center.
- Beginning at the bottom left-hand side of the design, count half the total of horizontal squares, and then count up half the number of vertical squares. This is the center of your chart. Diagram 41
To ensure that your counted cross stitch design is centered on your evenweave fabric, you must also find the center of the fabric. It is from this center point that you will begin to count out the design for your project.

STITCH COUNT
CROSS STITCH SYMBOLS
34 across
o red
x pink
18 down
/ yellow
C green Finding the Center of Your Fabric
To determine the center of your fabric:
- Fold the fabric in quarters
- Draw a thread of contrasting color through at the fold point. When you open your fabric, the thread will mark the cneter of the fabric. For some projects, it is helpful to baste (running stitch) along the two fold lines. The point at which your basting lines cross will be the center of your fabric.
Cross Stitch
Cross stitches can be scattered singly, in small groups, or may be used as a filling stitch for large areas. There are two secrets to embroidering a good cross stitch. First, keep it absolutely square. (This is why it is such an ideal stitch to use with evenweave fabrics.) Second, keep all of the top stitches of the "crosses" pointing in the same direction. You will understand this point better as we review how to make a cross stitch.
Bring needle up at A and insert it down at B. Bring the needle up again at C and down at D. Diagram 61.
When working cross stitch on evenweave, the threads are always drawn through the holes between the squares on the fabric. Always work over one square unless otherwise instructed.
Cross stitch on evenweave fabrics is illustrated in Diagram 62.
Horizontal Rows of Cross Stitch
When embroidering horizontal rows of cross stitches on evenweave fabrics, you will embroider over one square of the fabric, unless otherwise instructed, inserting the needle in the holes between the threads, rather than piercing the fabric. You will work half of each cross stitch across a horizontal row and return completing the cross.
Bring the needle up through the fabric at A and insert it down at B. Bring the needle up again at C, down again at D and continue across the row in this way. Diagram 63.
When the row is completed in one direction, you will return, crossing the stitches as you go. Bring your needle up at O and down at P, thus completing the stitch. Come up again at Q, down at R and continue until all stitches have been crossed. Diagram 64.
Diagram 65 illustrates cross stitch on evenweave.

Vertical and Scattered Cross Stitches
When there is a vertical line or a random scattering of cross stitches, work each stitch individually. Just remember that all of your top stitches should be going in the same direction in any one piece, unless a variation is planned for effect. Diagrams 66 & 67.
Cross stitch is a commonly used stitch on all types of fabric. When not using an evenweave, you still follow the same stitch instructions, but it is more difficult to keep all of your crosses absolutely square.
Backstitch
Backstitch creates a distinct outline. It is an easy stitch to control on small curved areas where very small stitches are needed and on loosely woven fabrics.
Bring the needle up through the fabric a short distance from the beginning of the line at A. Make a stitch backward, inserting the needle at the beginning of the line at point B. Bring the needle up at point C, the same distance in front of the first compelted stitch, so that the stitch and space on the surface are even in length. Diagram 45.
Insert the needle down at D, going back into the fabric at the same point where it was brought out for the first stitch (pointA). Bring the needle up at E and down at F. Continue in this manner along the line. Diagrams 46 & 47.
Stitches on the back of the fabric are twice as long as those on the front so that they overlap.
When working backstitch on an evenweave such as Aida, the threads are drawn through the holes between the squares on the fabric. Always work over one square unless otherwise instructed. Diagram 48.
Bullion Stitch
Bullion stitches re created by wrapping thread around the needle and securing it on the fabric. they can be arranged for bud effects or to make little leaves or petals.
Bring the needle up at A amd down at B. Do not pull the thread through. Bring the needle halfway up again at A, but do not pull the needle through the fabric. Diagram 49.
Holding the needle from below, wind the thread around the needle. The number of twists will be determined by the length of the stitich aand the thickness of the thread. As a rule, five or six twists are used. Diagram 50.
With your left finger and thumb holding the twist just made, ease the needle up through the twist with your right hand. Do not release your hold until the needle goes through. Slowly pull the remainder of the thread up through the twist. Reinsert your needle at B and gently secure the twist against the fabric. Diagram 51.
READING STITCH CHARTS
Types of Grids - Color Placement Charts vs Stitch Guide Charts
Figure A shows the most common type of grid seen in magazines and instruction leaflets. It can be used in two ways:
1. In Figure B each square represents one stitch. A symbol within the square indicates the color of the stitch and/or the type of the stitch.
The stitches can be cross stitches over two threads, cross stitches over one thread, needlepoint stitches or other types of stitches.
The advantage of this type of grid is that a very large design can be charted in a fairly small space.
The disadvantage is that decorative stitches are more difficult to depict.
2. In Figure C each line on the grid represents one thread of the canvas or fabric. The squares are the holes in the canvas or fabric.
Instead of using symbols for stitches, the stitches are diagrammed as they actually are constructed.
The advantage of this grid is that different sizes and types of stitches can be depicted easily on the same chart.
The disadvantage is that this type of chart usually requires more space.
The following examples show the same design charted in both ways.
The same blackwork pattern depicted two ways.
Other Types of Grids
This type of grid more closely duplicates the weave of the fabric or canvas.
It is more suitable for stitch diagrams than for symbols.
This grid duplicates the appearance of Aida cloth.
Actual stitches are diagrammed on this type of grid.
RULES OF THE TRADE FOR EMBROIDERY (The following instructions are excerpted, with permission, from the leaflet, How to Embroider, published by The National Needlework Association. The 33-page booklet is full of helpful information and stitch guides. It is widely available through local retailers.)
Here are some general instructions for embroidery. Take a few minutes to read through them and familiarize yourself with these basic techniques, then refer back as needed while you work.
How do I start a thread?
When you start a thread, you must secure the end. There are several ways to do this, but usually tying a knot is never recommended. Knots cause bumps on the surface of your project. One method is to pull the threaded needle up through the faric, leaving approximately a 1" tail on the wrong side. Hold the "tail" with your fingers, and work over it at the same time you are working the first few stitches on your project.
To begin a new thread in an area that has been partially worked, run your needle through the backs of a few of the stitches that are nearby. Draw the thread through until the end of the tail just disappears under the stitch backs. Then proceed with your stitching. (This should be done in a similar color, so the new thread will not show through). Diagram 36.
Another method, the Loop Method, can be used when your project calls for an even number of strands. Separate half of the number of strands needed, i.e., if your project calls for two strands of floss separate out one strand of floss. Cut the strand(s) twice as long as desired for stitching, approimately 24"-30". Fold the strand(s) in half, and insert the cut ends in the eye of your needle. The folded end is at the opposite end of the strand(s). Come up through the fabric, leaving the loop on the underside. Make your first stitch. Bring the needle down through the loop in the folded end of the strand(s), and pull until loop lies flat against the fabric. Diagram 37.
How do I end a thread?
Run the needle through the backs of a few stitches. You do not want to create bumps or knots in back of work. Diagram 38
. 
Where should I start stitching first?
Where you begin to stitch will depend on the type of embroidery you are doing and the design you are executing. In counted cross-stitch, for example, it's usually recommended that you begin at the center of the fabric and design
I have finished stitching one area, and there is another one nearby that I want to stitch in the same color. There is still some thread left in my needle. What should I do?
Do not carry thread far on the back if you are going from one area of the design to another. Even the slightest pull will cause a pucker. To get from one area to another that is nearby, you can run your thread under stitches on the back for short distances, as long as the two yarn colors involved are similar. Otherwise, end off your thread and restart it at the new area. Never carry a very dark color when you are working on a light color fabric.
As I work, I notice that my thread becomes twisted tighter and tighter. What should I do?
If your yarn becomes twisted or "kinked" as you work, just drop the needle and allow it to hang until the yarn untwists.
I made a mistake in my stitching! What should I do?
If you make a mistake that involves only your last few stitches, remove your needle from the thread and, using the end with the eye, slide the needle under the last stitch and pull up, taking out the thread. Continue to take the stitches out one at a time until the error has been removed. If the mistake is over a large area, you must carefully slide sharp embroidery scissors under the stitches and snip, being careful not to cut the fabric. Diagram 39.
Last Month's Tips and Techniques
QUICK TIP:
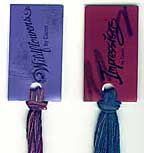
How to easily store your thread.
Use your CARON Collection thread labels as thread holders. By looping the threads through the labels (as shown) you've got a quick and easy thread holder. This way you'll always have the color and dye lot handy for each thread without any second guessing or mistakes.
TECHNIQUE TRICKS:
Cross stitching with variegated threads.
Contrary to what you might have read or heard, completing one cross stitch at a time while stitching with variegated threads may not always give you the effect you want. In fact working cross stitch in the traditional manner and working one cross stitch at a time will give you two very different effects with multi-colored (variegated) threads. Neither way is right or wrong. It just depends on the effect you wish to achieve.
Take a look at the following examples to see what happens when you change your stitching technique:
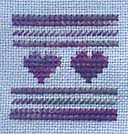
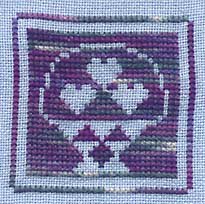
"HEARTS"
(Traditional Stitching)
This was stitched in the traditional manner. Notice the subtle difference in color along each stitch row.
"BASKET"
(Stitched One Cross Stitch at a Time)
In this example one cross stitch at a time was stitched. Observe the stripy effect in contrast to the more subtle and smooth transitions in color in the "HEARTS" example above.
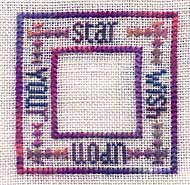
"WISH"
(Inner Square Stitched in Traditional Manner. Outer Square Stitched One Cross Stitch at a Time)
Here both techniques were used. The outer square has a more distinct and delineated coloration than the traditionally stitched inner square.
By using to your advantage the two distinctly different effects the techniques have to offer you can create exactly the look you want.
© 1997 The Caron Collection / Voice: (203) 381-9999, Fax: 203 381-9003 CARON email: [email protected] / Webmaster [email protected]