Treat Yourself to Our Free Online Class, Compliments of Our Featured Designer
If you missed the profile on Ilke J M Cochrane click here for her Designer Spotlight

Star of the Sea
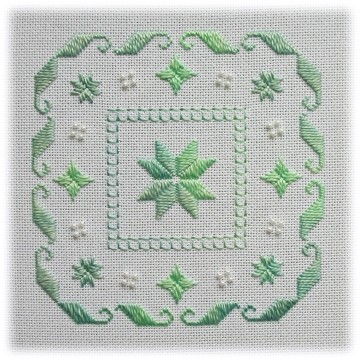
by Ilke J M Cochrane
This design is copyright to Ilke J M Cochrane of Mabel Figworthy's Fancies.The design is for your personal use: you may stitch it as often as you like, make working copies for yourself, and change it to your liking when you stitch it. You may not share, copy, forward or sell this design or any part of it in any form, or use it to make up kits.
General information
Stitch count: 110h x 110w
Fabric: 25ct White Lugana (Zweigart 100)
Threads: Caron Watercolours and Wildflowers 226 Seaglass; DMC stranded cotton B5200
Other materials: Mill Hill beads 00479 White
General instructions
• Calculate the finished size of your stitching by dividing the stitch count (see above) by the count of your fabric (e.g. 100 stitches on 25ct fabric would be 100/25=4").
• Cut your fabric with a generous allowance (approx. 3") around the design area, especially if you wish to frame the completed design.
• Mount your fabric in a hoop or frame, if using, and locate the centre. Mark this with a pin. The design-specific instruction will indicate a particular order of stitching, generally starting from the centre.
• Use a size 22 tapestry needle for Watercolours, a size 24 or 26 for Wildflowers, and a size 28 needle for attaching beads.
• On a hardanger chart, the lines are the fabric threads, and the white squares are the holes.
• If a satin stitch motif has a "seam" where stitches meet, always come up on the outside edge of the motif and go down where the stitches meet.
• When using a waste knot (at the front of the fabric) occasionally turn your work over to make sure you are covering the thread at the back.
Instructions for this design
• Don't be alarmed by the different blues in the chart! This is merely to indicate that a variegated thread is used.
• Work the central snowflake motif using 1 ply of Watercolours 226 Seaglass.
• Work the four-sided stitch using Wildflowers 226 Seaglass.
• Work the star and flower motifs using 1 ply of Watercolours 226 Seaglass.
• Work the modified ship motifs using 1 ply of Watercolours 226 Seaglass.
• Using 1 strand of stranded cotton, attach the beads. Begin with the cluster of four beads to the left of the top centre flower motif. Bring the needle up in the hole to the bottom right of where the bead is charted, pick up the bead, and go down the hole to the top left. Attach all four beads like this. Then attach the cluster of four beads to the right of the top centre flower motif. Bring the needle up in the hole to the bottom left of where the bead is charted, pick up the bead, and go down the hole to the top right.
• Now turn your work 90 degrees and repeat. Do this twice more to complete all four sides.
Click on the chart right for full size charts to print out. 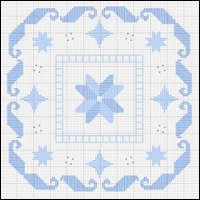 Or download this PDF
Diagrams
The following stitches are used in this design:
Snowflake motif – The snowflake motif in your design may be a different size from the diagram, but the basic instructions apply to all snowflake motifs. Come up at the numbers and stitch in the direction of the arrows.
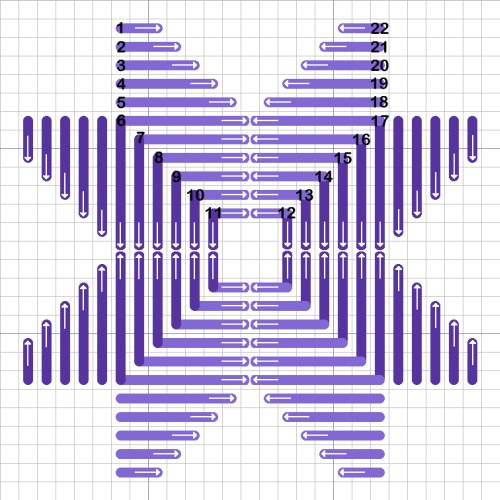
Four-sided stitch – Stitched over 4 threads. Come up at the odd numbers and go down at the even ones. Note the slightly different order of stitching on the corner square. The dotted lines show how the thread travels behind the fabric (illustrated for one ordinary square and the corner square). For a lacy effect, pull the thread when coming up trhough the fabric.
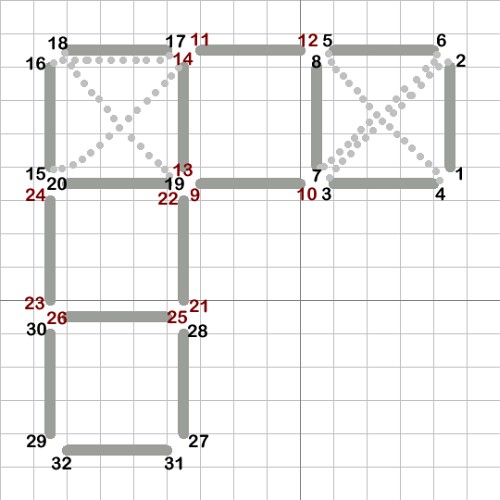
Star motif – The star motif in your design may be a different size from the diagram, but the basic instructions apply to all star motifs. Come up at the numbers and stitch in the direction of the arrows.
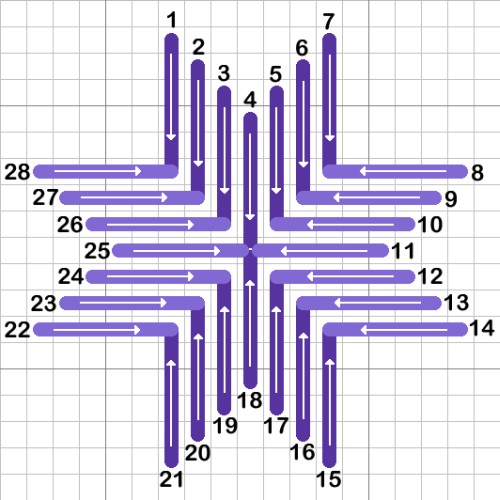
Flower motif – The flower motif in your design may look slightly different from the diagram, but the instructions apply to all motifs where the four sides meet forming a diagonal cross the centre. Come up at the numbers, and go down where the stitches meet.
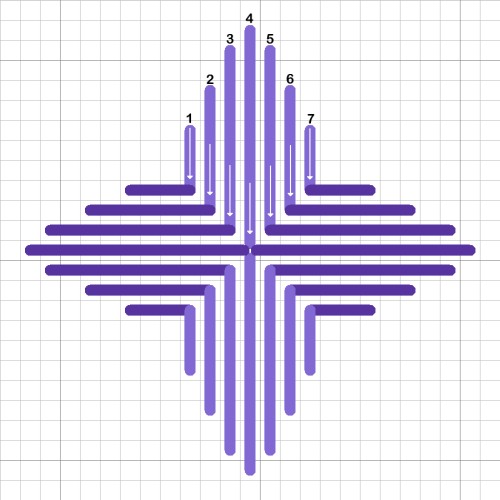
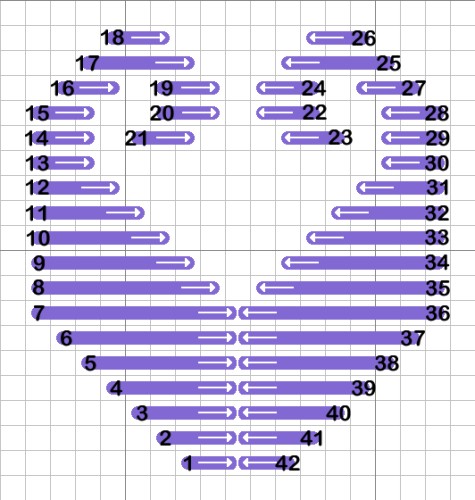
Ship motif – A traditional Hardanger satin stitch motif; the diagram shows two ship motifs stitched together. The ship motif in your design may look slightly different from the diagram, but the basic instructions apply to all ship motifs. Come up at the numbers and stitch in the direction of the arrows. Note the order of stitching for the "hooks" at the top, and also where you move from the first motif to the second.
Thank you for buying this design. If you have any comments or questions about
the chart pack, do drop us a line at fancies@mabelfigworthy.co.uk – and we'd love to see pictures of your stitching!
If you enjoyed this design, why not look on www.mabelfigworthy.co.uk
for your next project? |

