| Dyed and Gone to Heaven – An Online Magazine and Needlework Resource |
|
 |
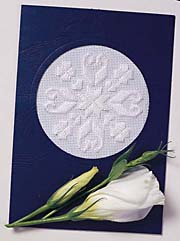
We celebrate Hardanger and give our special thanks to Mary Hickmott for this kid's project
A pattern from Mary Hickmott's book "Easing into Hardanger"
(distributed by the Caron Collection)
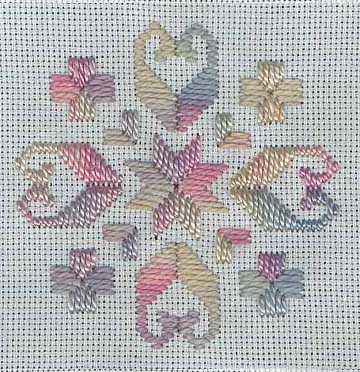
Stars, Ships and Crosses
Counted Satin stitch is an essential feature of Hardanger embroidery, and is made up entirely of straight stitches lying next to each other on the fabric. As the charts for Hardanger embroidery are usually drawn with the lines of the grid representing the threads of the fabric, the length of any stitch can be seen by the number of threads (lines on the chart) over which it passes.
Stitches often vary in length from each other but it is easy to gauge their placement by relating each to the last stitch worked. Always count carefully and check regularly over a piece of work that stitches are lining up correctly according to the chart.
- To work this design you will need...
White 22 count Hardanger fabric 6 ins (15 cms) square.
Tapestry needle size 22
One skein of Caron Watercolours Parfait #023 or white Pearl cotton no 5.Click here for the CHART
Fastening on
To fasten on in the first place, it is often possible to use a waste knot. The thread to be used is knotted at the end and taken down through the front of the fabric in a position that will ensure that the stitches about to be worked will cover the thread at the back. When a sufficient number of stitches have been worked - about an inch or so - the knot can be lifted at the front of the work and the thread cut off very close to the fabric. The end that was attached to the knot will disappear through to the back of the fabric and the starting thread will be held in place.
- Subsequent stitches within the same motif can be fastened on by using another waste knot or by passing through the back of existing stitches. Try not to strand across spaces in the design especially if going from one motif to another. It is much better to fasten on again for any individual part of the design.
Fastening off
Threads can then be fastened off by passing the needle through the stitches at the back of the work for an inch or two. Blocks of satin stitch form 'channels' that make this particularly easy to do.
- Instructions
Central star motif
1 Find the centre of the piece of fabric by lightly folding it in half each way.
2 Use a waste knot to fasten on and bring the needle up through the fabric, 6 fabric threads above the centre.
3. Take the needle down into the central hole.
4. Stepping the stitches as shown on the chart, work the four stitches to the left of the central one. Each stitch goes over six fabric threads.
5. In order to work the horizontal stitches that come next, bring the needle out at the position marked A on the diagram, six threads to the left of the hole into which the last stitch was taken.
- 6. Now take the needle down into the same hole as the one into which the last vertical stitch was taken.
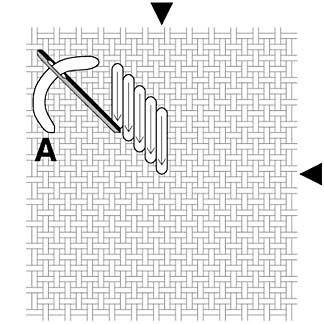
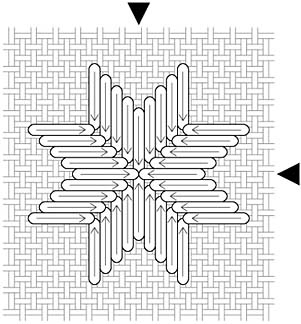
7. Continue in the same way to make the satin stitches that form the central motif. The stitches are taken in the directions shown in the diagram.
8. Fasten off the thread by passing it through the reverse side of the stitches for about an inch.
- Ship motifs
This very old, traditional motif often appears in Hardanger embroidery in a variety of forms. Its name probably derives from its similarity to the shape of the prow of a ship; an obvious choice to a seafaring nation such as Norway.
Referring to the main chart, count out carefully from the central motif to the starting point marked A on the stitch diagram.
Work the stitches in the direction of the arrows. Notice that the thread is taken down into holes that will be used by more than one stitch.
Form the second part of this motif in the same manner taking stitches vertically upwards to share holes with the first part where appropriate.
- Remaining motifs
Count out carefully to the starting positions for these and, again, be sure to start at their outer edges so that the needle can always be taken down towards the centre.
- Finishing
When the embroidery is complete it can be washed in warm water with soap powder if necessary. It should then be laid flat to dry and, whilst still damp, be pressed from the wrong side against a well padded surface - a thick towel is good - with a warm to hot iron. The embroidery will stand out beautifully from the fabric.
Tip for neat work
Every now and then allow the needle to hang freely from the work so that the thread can regain its twist.- COPYRIGHT NOTICE: This pattern/chart is provided for our visitors use only. None of these designs or instructions can be reproduced or distributed in any form (including electronic) without the prior written permission of Mary Hickmott.
COPYRIGHT NOTICE: No part of these instructions/project nor the included diagrams/illustrations can be reproduced or distributed in any form (including electronic) or used as a teaching tool without the prior written permission of the CARON Collection Ltd. One time reproduction privileges provided to our web site visitors for and limited to personal use only.
© 1999 The Caron Collection / Voice: (203) 381-9999, Fax: 203 381-9003
CARON email: [email protected] / Webmaster [email protected]