| Dyed and Gone to Heaven – An Online Magazine and Needlework Resource |
|
 |
Back to Main Online Class Page
Anthony Minieri
AUTUMNAL SCENTIMENT
Part II (Continued from January's class)If you missed PART I
The beauty of an antique perfume bottle with atomizer, coupled with the beauty of silks and metallics and wonderfully textured stitches and techniques bring "Autumnal Scentiment" to life. In this class, designed for the experienced stitcher, you will experience Free-form Fly Stitch, Florentine Patterning, Rhodes, Fleur-de-Lis Crescents, Whipped Backstitch, Stem and Venetian Cloth Stitch. While learning these techniques you will work with three luscious Caron Collection threads: Waterlilies, Impressions and Soie Cristale, as well as floss and metallic braid. (Click on the picture for a full size photo for reference.)
INSTRUCTIONS PART II
For a list of materials, please refer to the instructions in Part I posted last month.
AREA 3. Perfume Bottle Lower Portion
Notice the letters A, B, C and D at the bottom of the Upper Areas Master Chart (see last monthís on-1ine class) and at the top of the Lower Areas Master Chart. These are where the two charts join.

From points B and C work the two curving lines of whipped backstitch that delineate the central area of the lower portion of the bottle.
Fleur-de-Lis crescents. Using 1 strand of Impressions, stitch the four fleur-de-lis crescents that form the ornamentation in the central area. Refer to the master chart for placement. Follow the numbering carefully. There is an upper and lower crescent on each side in mirror image of one another.

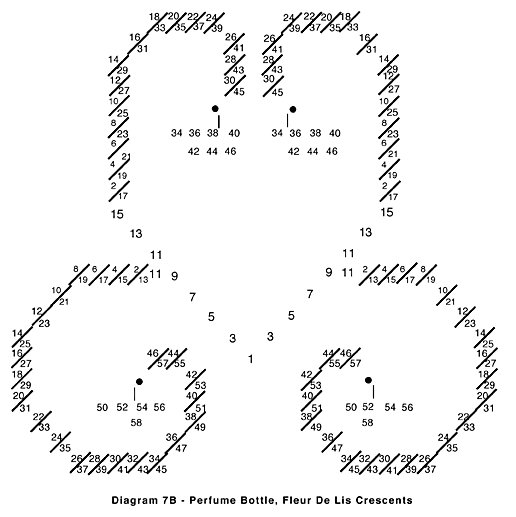
On each side points 1, 3, 5, 6 and 9 are common to both the upper and the lower crescent.
When stitching this type of stitch all subsequent stitches pass over what has been previously stitched. Always work from the outside of the curve in when taking your stitches. For instance, when working the lower crescent on the right side, take stitch 1-2. Since this curve is going to the right, the inside of the curve is below stitch 1-2, so when you bring your needle to the surface for 3-4 you will be above stitch 1-2 or on the outside of the curve.
This will remain true until stitch 23-24. When you bring your needle to the surface for stitch 25-26 you will be to the right of what has been stitched because this is the outside of the curve. At stitch 33-34, you will be below the curve until you reach 47-48 where you will be to left of the curve.
Please notice that points 50, 52, 54, 56 and 58 all go into the same hole. This plumps up the end of the stitch thereby giving it its name of Fleur-de-Lis. The same holds true for the other three crescents. Always work from the outside of the curve in.
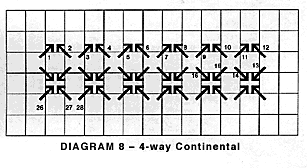
Background central area. With 1 strand of Waterlilies, stitch the background of the area in 4-way continental. Follow the numbering carefully and work in horizontal rows. This will give very light coverage. You must follow the patterning carefully or your passing threads will be visible from the front.
Leaves, side areas. Stitch with 3 strands of Waterlilies and work the leaves exactly as you did the leaves in the upper central area. Refer to master chart for placement and to the instructions in Part I for directions on stitching the leaves.
Backgrounds, side areas. Do basketweave with 2 plies of Soie Cristale: traditional slant in the left area and reverse slant in the right area. The outside line of tent stitches has been charted on the master chart.
Base of bottle. Use 1 strand of Impressions to complete this area in Gobelin stitches. See the master chart for the correct placement of each group of stitches. Cover the shared holes with vertical straight stitches as diagrammed on the master chart.
AREA 4. Atomizer Neck
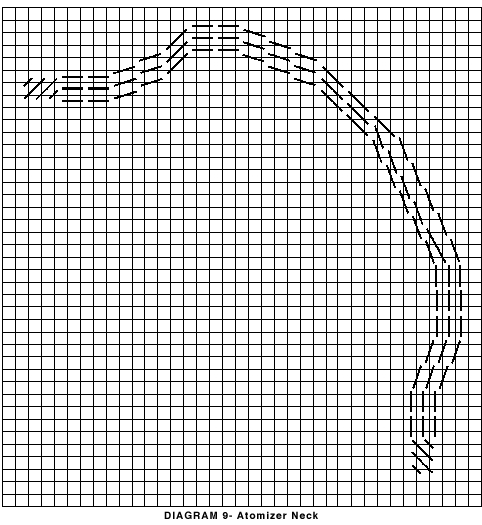
Using the metallic thread, stitch the neck of the atomiser in 3 rows of Whipped Backstitch. Begin next to the cashmere stitch at the right of the Rhodes at the top of the bottle.
Work each row separately and pay close attention to the stitch slant and length. Both the slant and length of stitch change along each row and the three rows are different from one another.
After all three rows are whipped, go back to the top and whip all three rows together one more time by sliding under each set of three backstitches once until you reach the bottom of the neck.
With the metallic, stitch the connector to the hose in an Elongated Reverse Slant Cashmere stitch as diagrammed.
End of Part II.
COPYRIGHT NOTICE: No part of these instructions nor the included designs/charts can be reproduced or distributed in any form (including electronic) or used as a teaching tool without the prior written permission of Anthony Minieri. One time reproduction privileges provided to our web site visitors for and limited to personal use only.
© 1997 The Caron Collection / Voice: (203) 381-9999, Fax: 203 381-9003