Marcia Brown, owner of The Binding Stitch, has
been serving designers, retailers and private clients since 1979 with expert
needlework finishing and mounting. Marcia has developed more than 150 different
needlework finishing techniques for The Binding Stitch staff in order to
present any needlework project in its finest form. It is her love for design
and professional presentation which has accorded her recognition throughout
the industry as both a superb technician and talented teacher. She is a
graduate of the University of California, Davis in Home Economics which
she has taught in the public school system. Since 1992 she has been teaching
nationally for needlework venues such as The Spirit of Cross Stitch, I
Love Needlework, A Sampler Gathering, Celebrations and Silver Threads.
The secrets to making beautiful twisted cords
and tassel embellishments, perfect pillows and accessories, rugs, standing
figures, ornaments, stockings and other unique needlework items are what
Marcia loves to share with her students. Marcia is also contributing editor
for Fine Lines the newsletter magazine for the Historic Needlework Guild.
She has just produced a four-volume Video Teaching Series covering basic
needlework finishing techniques.
MATERIALS:
(1) 33 meter skein Watercolors by Caron (color Faded Linen for
sample)
1 ball DMC #8 cotton perle (color 927 for sample)
8 small white shells (approximately 3/4 - 7/8 inch wide) with holes
at the hinge
(1) 3 X 6" cardboard card
TO MAKE THE CORDING:
For the one-color cord hanger, make a 12-ply fiber set 54 inches long.
Tie a knot in each end of the fiber set . Secure one end to a hook on the
wall, drawer, cupboard, or find a willing party to hold. Twist the free
end in one direction by hand or by attaching to a mixer blade or a drill
fitted with a cuphook. Twist until the fibers become so tightly twisted
that they almost create fine kinks. When the fiber set is twisted, hold
the mid-point and bring the two free ends together. Allow a few inches
from the mid-point fold to wind back on themselves. Repeat with a few inches
at a time until the entire length is twisted. Knot the ends which were
last to wind together to hold the twists.

THE TASSEL BODY
Holding the 3 X 6" card vertically, begin winding the Watercolors onto the card starting at the bottom edge. When all the fiber has been
wound onto the card, insert a free end of the twisted cord between the
wraps and the card as illustrated. Place the center point of the cord at
the center top of the tassel head. Tie the two free ends of the cord into
a knot, and rotate this knot into position inside the center top of the
tassel head. This knot will create a solid form around which the tassel
head fibers will lay. Carefully slip the wraps from the card.
With your right hand, grasp the tassel with the hanger loop facing left
and the skirt loops facing right. With your left hand, pull on the hanger
loop and smooth the fibers of the tassel body by stroking with your right
hand. With your left hand, pinch the hanger cord tightly at the head with
your left thumb and forefinger. Drop the tassel body and with your right
hand, grasp the end of the hanger loop and wrap this around your left thumb
and forefinger tips to create a knot that sits securely at the top of the
tassel head.
To create the tassel neck, cut a piece of coton perle 1 1/4 yard long.
Lay the tassel on the work surface and slide the midpoint of this fiber
under the tassel. Bring the free ends up over the tassel and tie an overhand
(the first step in tying your shoes) approximately one inch from the head
of the tassel. Without letting go of the ends, pick up the tassel by raising
the fiber ends in the air and flip the tassel over on the table. Tie another
overhand on this opposite side and complete your tie with a square knot
(right over left and left over right). With one of the tie ends create
a loop (a hangman's noose) next to the knot that will stand up in front
of the tassel head. Hold the base of this loop with your thumb at the neck.
With the other tie end begin wrapping parallel wraps above the original
neck tie, wrapping over the base of the hangman's noose. Place five wraps
in this manner and bring the end of this wrapping fiber through the hangman's
noose. Hold this tightly with your left forefinger while you begin pulling
on the end of the hangman's noose to close this and pull the wrapping fiber
behind the neck wraps. You will notice that one of the two working ends
is exiting the neck at the top and the other from the bottom. Thread up
the top working fiber and insert the needle at the exit point ,bringing
the needle carefully down through the neck of the tassel and on down through
the skirt. Thread up the bottom fiber and insert the needle one thread
above the exit point, bringing the needle down through the center of the
neck and into the skirt.
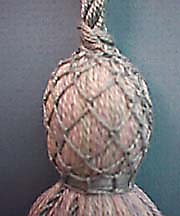
THE DETACHED BUTTONHOLE LATTICEWORK
Begin with a long fiber length thread on a tapestry needle. Knot the
end. Open up the skirt fibers and insert the needle up through the center
of the neck and come out just at the edge of the knot at the head. Catch
a fiber on the knot as you form an even row of loops around the base of
the head knot. Work a second row of buttonhole stitches in each of the
loops on the first row. Keep the stitches loose. These stitches should
not catch the fibers in the head of the tassel, but should remain detached,
creating a mesh over the head.
Cover approximately 2/3 of the tassel head and finish by stitching the
final row of buttonhole stitches, inserting the needle behind the neck
wrap and pulling the mesh down tightly over the head. The final row will
appear to be an evenly spaced row of buttonhole stitches over the satiny
neck wrap.
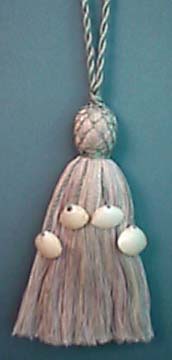
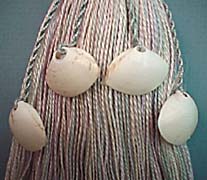
THE SHELL OVERLAY
Cut 4 2-ply sets of coton perle 30 inches long. Thread one shell onto
each set, placing the shell in the center of the strands. Knot the ends
of each set. Secure one end and twist each set in the same manner as above,
so that when the strand is released, the shell will be at the end of the
twisted cord. Repeat until all four strands have been twisted. To attach
the partially made decorative cord, cut the knots from the cord end and
thread immediately onto a large eye yarn needle. Insert the needle at the
base of the neck wrap, just below the buttonhole stitches. Sew through
the tassel to the opposite side and exit at the base of the neck wraps
and buttonhole stitch on the opposite side. Bring the cord end through
and determine how long the drops on each side should be. Make the adjustments
necessary. Unthread the yarn needle and open the free ends of the cord.
Thread one double strand into the shell hole and tie a knot just inside
the hinge on the inside of the shell. Put a dot of glue at this hidden
spot and secure the knot. Trim the tails off. Repeat with the remaining
three cords and shells.
COMPLETING THE SKIRT
Using care and a large pair of sheers, cut the loops at the lower edge
of the tassel skirt. Lay the tassel on a work surface and pull all the
shell cords over the head out of the way.
With a comb or plastic brush, brush the tassel skirt and trim the uneven
skirt fibers even across the bottom. Repeat the combing and trimming until
the tassel bottom is uniform.
Pick up the tassel and allow the shell cords to fall into place. These
cords will hang more
precisely if they are each secured lightly with a dot or glue to the
skirt fibers.
This tassel can lend a seaside look to any decorative scheme. I hope
you will have fun creating your own using these simple techniques in many
color combinations and themes.
Make you own space even more special with a graceful addition of color
and texture
"...it is in our homes that we
can become more truly ourselves by paying greater attention to the specific
ingredients and finishing touches we select to change our homes into something
that is uniquely our own, and our daily routines into graceful rituals."
Alexandra Stoddard, Living a Beautiful
Life
For more information on Marcia's upcoming class
schedule, Video Series or services available through The Binding Stitch
contact her by mail at 8 Taunton Avenue, Dennis, Ma. 02638 or call (508)
385-2444 or e-mail her at [email protected]
COPYRIGHT NOTICE: © 1998 The Binding Stitch. Permission
granted for shop owners and guilds to copy. One time reproduction privileges
provided to our web site visitors for and is limited to personal use only.
Any other use whether it be electronic or otherwise requires the express
written permission of The Binding Stitch.