| Dyed and Gone to Heaven – An Online Magazine and Needlework Resource |
|
 |
Back to Designer Spotlight Page
FREE pattern & instructions compliments of David McCaskill
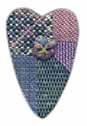
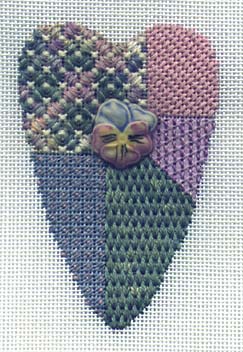
Click on the picture on the left for a full size photo of the design for reference while stitching.
SKILL LEVEL REQUIRED: Experienced stitcher.
MATERIALS LIST:
Threads
2 skeins each Watercolours: 014/Sunset
1 skein each Impressions: 0000, 2035, 5126, 6014, 7005
6 x 8" piece 18-ct mono canvas
#22 & #24 tapestry needles
Pansy porcelain button
permanent marking pen
6 x 8 stretcher bars
laying tool
(all of the above materials should be available through your local needlework store. If you are unable to locate these items please call "Club Stitch" at 800-310-1546 for assistance.)
TRANSFERRING THE DESIGN:
- Lay the blank canvas over the stitch map, aligning the top to a horizontal thread of the canvas. Using a permanent marker, lightly trace the outline of the scissors cases. All of the patchwork lines are drawn on the vertical or horizontal thread or on a true diagonal.
- NOTES TO REMEMBER:
The following stitch charts illustrate complete stitch patterns. When working the patterns in the actual design area, compensating stitches will be necessary at the edges of each area. Stitch as much of each pattern as you can within the area you have drawn on your canvas.
Prior to beginning a new ara, familiarize yourself with the written instructions as well as the diagram.
- STITCHING INSTRUCTIONS
- AREA 1
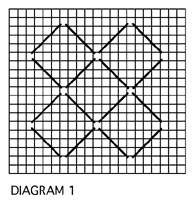
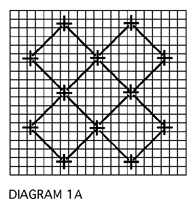
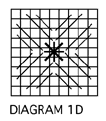
Working with 2 strands of Impressions 0000, lay in the grid (Diagram 1). Use a laying tool.
When the grid is complete work an upright cross over each intersection of the grid (Diagram 1A) with 2 strands of 0000 Impressions.
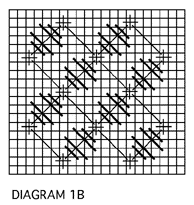
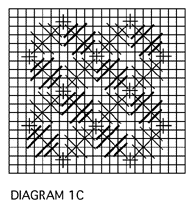
With 1 ply of Watercolours begin to fill in the pattern as in Diagram 1B, working all of the rows in the same direction; then repeat in the opposite direction as in Diagram 1C.
Fill in the remaining spaces with a Smyrna Cross done with 1 strand of Impressions 0000 Before starting Areas 2-5, cut about 3 yards of the Watercolours into color groups: peachy-pinks, purples-plums, greens and then the remaining colors. Use only the first three color groups for the remaining stitch patterns as directed.
AREA 2
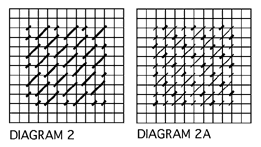
With 2 strands of Impressions 2035 lay in the pattern as in Diagram 2. Fill in with 1 strand of Watercolours of the peachy-pinks only (Diagram 2A).
AREA 3
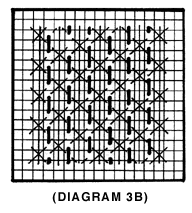
With 2 strands of Impressions 6014, lay in long vertical rows over the entire design area (Diagram 3). Couch down with cross stitches (Diagram 3A). Note that the cross stitch rows do not follow a true diagonal from right to left.
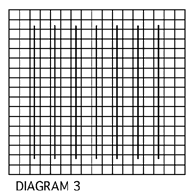
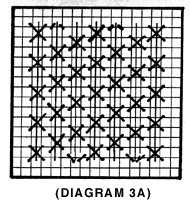
Complete the pattern using the purple/plum Watercolours, working the rows in a diagonal direction. AREA 4
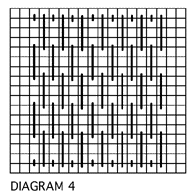
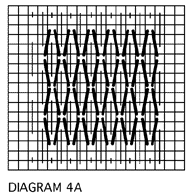
With 2 strands of Impressions 5126, lay in upright stitches (Diagram 4). Using the green Watercolours pieces, complete the pattern as in Diagram 4A, working horizontally.
AREA 5
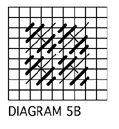
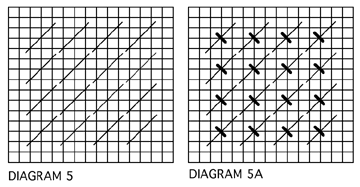
Working with 1 strand of Impressions 7005, begin the stitch pattern (Diagram 5). Using the peach/pink Watercolours, cross over the stitch as in Diagram 5A.
Finish the pattern with 1 strand of Impressions 7005 (Diagram 5B).
Attach the Pansy button over the intersections of all the patches.
FINISHING
Make into a scissors case.
Use the extra skein of Watercolours, and any leftover full yardage from the first skein, to make a cord long enough to hang the scissors case around your neck.
A MESSAGE TO THE WEB SITE VISITORS FROM DAVID McCASKILL
I sincerely hope that you enjoy the piece and I really appreciate the opportunity from The CARON Collection to share my love of needlework with you.
(Permission to reproduce this has been granted by David McCaskill for personal use only. These charts cannot be reproduced, electronically or otherwise, or sold without the express written permission of the designer.)