Instructions and Charts
Compliments of Judi Kauffman
It's exciting to be featured as "Designer of the Month" for
the Caron Collection. I thought it would be fun to create something that
combines two of my favorite techniques, foundation piecing and embroidery.
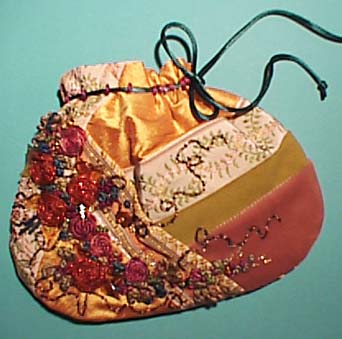
I like to make my projects versatile so I designed this elegant little
drawstring pouch to be used for jewelry or as an evening bag. You can even
change the size by enlarging or reducing the basic pattern. Tiny pouches
are perfect for earrings. Larger pouches are good if you don't like a small
purse.
Customize the design by changing fabric and thread colors to suit your
taste. For example, use all ivory, white and cream tones and it would be
perfect for a wedding. Or use all deep rich colors for winter and New Year's
Eve. The same design would make an elegant pillow or pincushion (change
the shape to a square or rectangle). Adjust the number and size of the
flowers as desired.
There are only a few basic stitches involved so it's a good project
for beginners. The sparkle of the Rachelette and the subtle color changes
in the Watercolours are the most exciting part of the design! I chose a
Victorian-influenced palette of golds, mauves, peach, aqua and olive but
any color combination would work. Don't worry about making them "realistic"
unless you want a natural look. Add beads, buttons and charms for extra
dimension and sparkle -- I put three long bugle beads (salvaged from an
old dress) next to one of the roses.
Materials:
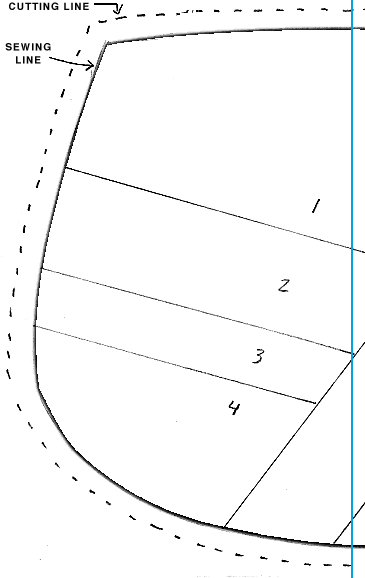
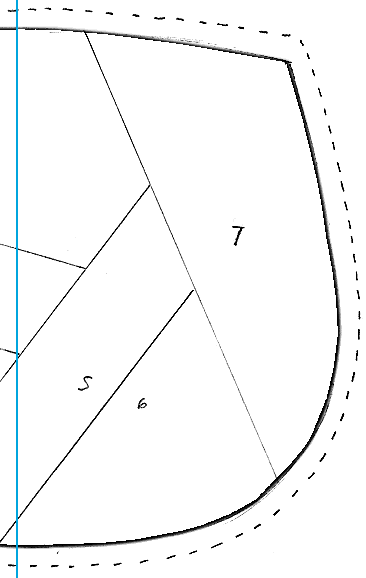
Piece together the pattern below
matching up the blue center lines.
Instructions:
1. Using pencil or permanent fabric marker trace foundation piecing
pattern onto Fun-dation transluscent quilt block piecing material. Do not
use paper. Fun-dation material will be left inside project as a stabilizer.
2. Follow general foundation piecing directions below to complete front
of purse. Cut shape along dotted line.
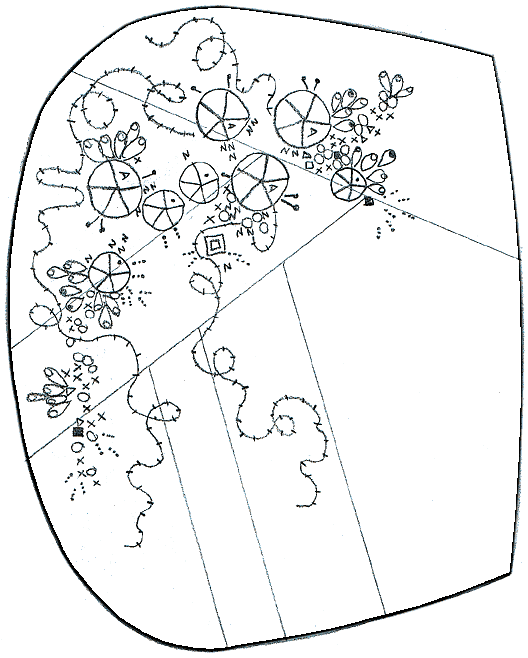
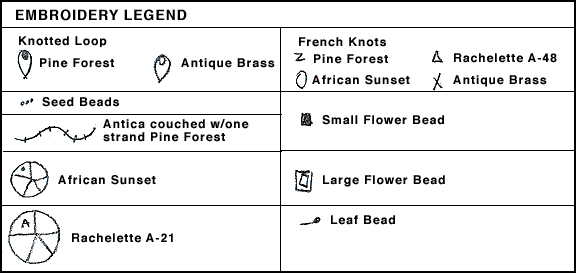
3. Following color key and diagram, embroider flowers, leaves and couched
tendrils. Use chenille needles for all embroidery.
4. Use sewing thread doubled in needle to sew on beads, charms and any
embellishments you choose to add.
5. Tear/trim Fun-dation material away EXCEPT under the embroidered areas.
6. Place front and backing fabric together right sides facing. Sew along
seam line. Trim seam allowance to 1/4" and clip curves. Turn right
sides out.
7. Sew lining fabrics together, right sides facing. Leave a 3"
opening at the bottom to use for turning project. Leave right sides together.
Trim seams and clip curves (except at 3" opening).
8. Place the lining (which remains wrong side out) OVER the purse (which
is right side out) and baste top edge. Sew top edge on seam line. Turn
project right side out through opening in lining. Sew lining closed and
place it inside the purse. Lightly press top edge so lining does not show.
9. Holding rattail (or cord) 5/8" from top edge, make small loops
OVER rattail/cord every 1/2" with Watercolours. This loop edging forms
the "casing" used to gather the top of the purse. See diagram.
10. Tie a knot at the cut end of each tail of rattail/cord. Dot with
Fray Check so ends won't fray.
11. For an evening bag, add a shoulder strap cord secured inside purse
at sides. Length will vary depending on height of person (44" is a
nice length if you're not sure).
General Foundation Piecing Directions:
Machine stitch 12 stitches per inch. OPTION: Project can be pieced
by hand if desired
Reminder: Since you are building the block from the wrong side of the
marked foundation, the finished block will be a MIRROR IMAGE of what appears
on the drawn lines.
1. Using ruler and pencil or fabric pen trace the block (lines and section
numbers) onto Fun-dation transparent quilt block piecing material.
2. Cut a piece of fabric large enough to cover Section 1 of the block,
plus at least 1/4" seam allowance all around it. Pin this fabric to
the Fun-dation with the WRONG side of the fabric against the unmarked side
of the Fun-dation pattern. NOTE: YOU WILL BE WORKING FROM THE MARKED SIDE
OF THE FUN-DATION WHEN YOU BEGIN TO SEW.
3. Place fabric for Section 2 on top of Section 1, RIGHT sides together,
so that both edges overlap the printed line between the two sections. Be
sure fabric #2 is large enough to cover Section 2 plus a generous 1/4"
allowance. To check placement before stitching, fold fabric #2 over to
its right side to be sure it covers Section 2 and has seam allowances all
around.
4. Turn the Fun-dation over so you can see the printed lines of the
pattern. Place the block underneath the presser foot of your sewing machine
with the Fun-dation side up. Start stitching just before the printed line,
stitch directly along the line and stop one or two stitches beyond the
line. For stitches that meet the edge of the block, stitch just past the
dotted cutting line.
5. Carefully trim seam allowance to a scant 1/4". Fold fabric #2
to the right side to cover Section 2 on the Fun-dation. Press along seam
line.
6. Add fabric #3, aligning it right sides facing, with fabric #2. Check
its placement to assure full coverage of Section 3 and stitch along the
line between Sections 2 and 3 as you did in Step 4. Trim seam allowance
and press.
7. Continue with each fabric, in numerical order, until the block is
completed.
8. Finish according to instructions above.
NOTE: Fun-dation material comes with full directions and diagrams on
the package or bolt. It is sold in packages of 8-1/2 x 11 sheets as well
as by the yard.