8. Now you can begin to fill in the background "night
sky" with your blue thread. You can continue to use the
same technique of hooking and creating loops to do this, or you
can fill in the background with a variation of the Satin stitch,
called the Long and Short stitch. Begin at the edges of the star
design, working out toward the outside edge. If you are using
long and short stitches to do this, use the darning needle, threaded
with the blue thread, to stitch with. For a diagram and instructions
for making the variation of the Satin stitch called the Long
and Short stitch see diagram and text below.
| Satin
Stitch: Work straight
stitches across the shape as shown. Conform stitches to the shape
you will be filling in. Care should be taken to keep a good edge.
Do not make the stitches too long as then they could be pulled
out of position. Butt each consecutive stitch to the one before
it to create solid patch of color in area to be stitched. |
 |
| Long
and Short Stitch: This
is a form of Satin Stitch that got its name because all the stitches
are of uneven lengths. It is often used to fill in a shape which
is too large or too irregular to be covered by using only the
satin stitch. It is also used to create a shaded effect, as shown
in diagram. In the top (first) row, the stitches are alternately
long and short and closely follow the outline of the shape to
be filled in. In the succeeding rows, long and short stitches
are worked to fill in the rest of the shape and to give a smooth
texture. |
 |
9. Fill in the background up to about 1/4" from the edge
of your marked outline. If you are using loops for the background,
continue to do so right up to the very edge of your circular
pattern. If you are using the Long and Short stitch, as you work
toward the round border, try to shape your stitches to the round
contour of the outline as you work. For the last 1/4", use
a chain stitch to complete the outside edge, covering your traced
outline as you work. For a diagram and stitch instructions for
the chain stitch, see diagram and text below.
| Chain
Stitch: Bring the
thread out at the top of the line and hold down with your left
thumb (if right-handed). Insert the needle where it last emerged
from the fabric and bring the point of the needle out a distance
away. Pull the thread through, keeping the working thread under
the point of the needle. |
 |
10. You now have a miniature hooked rug! Remove the fabric
from the embroidery hoop and lay it face down on a flat surface.
Use the Elmers Glue to run a bead of glue around the last stitches
of the outside border, on the wrong side of the fabric. This
will keep the edges of the fabric from unraveling when you cut
the fabric. Wait for the glue to dry and then with your scissors
cut around the design, leaving about 1/4" of unstitched
fabric all around the edge. After you have cut out the design,
use your scissors to make small cuts from the edge of the fabric
to the edge of your stitched design all around the whole circle.
Make a cut about every 3/4". This will help the fabric to
lay flat over the edges of the tin top when you glue your design
in place.
11. Take your tin top and place it face up on a flat surface.
Cover the entire top with a thin layer of Duco Cement. Then cover
the back side of the fabric, over your stitching, also with a
thin layer of Duco Cement. Place your design in position over
the tin top, moving it around as necessary to align all the edges,
so that they match the same outline as the tin. When the design
is in place, fold over the extra fabric around the design and
press it flat against the sides of the tin to secure it. The
Duco Cement dries fairly quickly, so over the next 5 to 10 minutes
just keep pressing down your design on the top and along the
sides firmly, everywhere, until the glue begins to set.
12. Once your design is secured to the top, go over all the
extra cross stitch fabric that has not been stitched with a dark
blue or black magic marker, with medium point, to color the unstitched
fabric. That way, if your design is not aligned exactly right,
darkening the edges will cover any small areas that might not
be stitched exactly to the edge of the tin and the top of the
sides around the tin, before you attach the ribbon to the sides.
13. With the Duco Cement, lay a thin film of glue all around
on the sides of the tin (over the extra fabric folded over the
sides and the metal lip below it). Then take your ribbon and
place it around the sides in a circular manner till the ends
meet. Cut the extra ribbon off as close as you can to join the
two ends seamlessly and press down to secure until glue dries.
If you are unsure where to cut your ribbon, cut your piece a
little longer and trim it after the glue has dried. You can the
touch up the ends and press them down with more glue for a "seamless"
fit later.
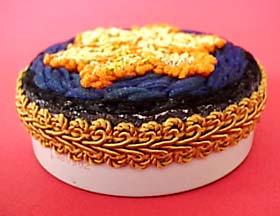
14. When the border ribbon is set and the glue has dried,
place your tin top over the tin bottom. With or without the candy
this will make a beautiful, unique and useful holiday gift or
something special for you to keep your own treasures in (that
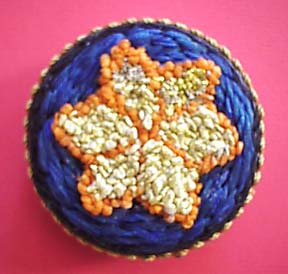
is, after you finish eating the candy!). Your Brilliant Star,
set against the deep night sky will shine on, and on, throughout
the New Year!
Other applications for your miniature "hooked" design
include: line the bottom of your stitched design with some cork
(available in thin sheets at craft and hobby stores), cut to
the same size, to make a coaster; use it to decorate a bag, a
pocket, or some other part of a pair of jeans or top; use it
as a rug for a doll house. Enjoy and Happy New Year 2000! You
are making history!
COPYRIGHT NOTICE: No part of these instructions/project
nor the included diagrams/illustrations can be reproduced or
distributed in any form (including electronic) or used as a teaching
tool without the prior written permission of the CARON Collection
Ltd. One time reproduction privileges provided to our web site
visitors for and limited to personal use only.