|
|
 |
Carolyn Mitchell of Manitoba, as our Online Class Teacher
HOLIDAY SNOW
Carolyn's expertise ranges a gamut of techniques: Canvaswork,
Hardanger, Blackwork, Bargello and Counted Thread, as well as
having a special familiarity with Smocking and Pulled Thread
Work. She has been an active member of the EAC (Embroidery Association
of Canada) since 1977 and received her teaching certificate in
Canvaswork from the National Standard Council of American Embroiderers.
Embroidery education is her main focus. Carolyn occupied the
Education Chair of the EAC from 1990 to 1994 and currently serves
as an EAC counsellor in their correspondence course program.
In addition, she has authored both beginner and advanced Hardanger
courses and has published two books: Velvet and Lace and Samplings in Hardanger Embroidery. Last, but certainly
not least, Carolyn is the proud proprietress of a shop with the
curious name of "Mrs. Twitchett's Eye" in Winnipeg,
which will be spotlighted in the August edition of our Shop Focus.
HELPFUL HINTS BEFORE WE START 1. Tape all four sides of your canvas. This prevents the canvas
from ravelling and the threads from snagging on the edges. BOOK RECOMMENDATIONS: THE ENCYCLOPEDIA OF CANVAS EMBROIDERY STITCH PATTERNS by Katherine
Ireys. ISBN 0-690-26336-8 published by Thomas Y. Crowell Company
New York
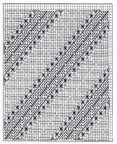 Click
on chart for larger version to print out Click
on chart for larger version to print out
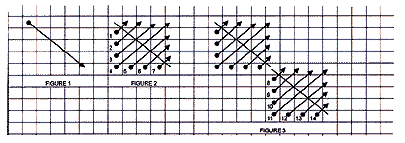
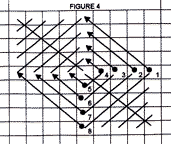
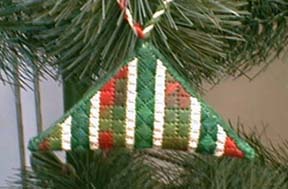
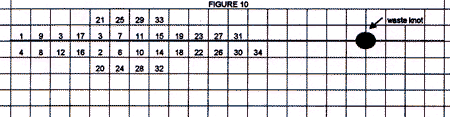
HOLIDAY SNOW This pattern is worked on the diagonal and when it is assembled it will become stripes. The second sample is the same design just reversing the Impressions and Waterlilies. This design was backed with fabric and a bow placed on top to represent a present. A chart is provided with the over all design to show how the stitches fit into each other. The following is step by step instructions and diagrams of the stitches used. START: Measure in 1 and « inch from both the top and side of the left hand corner. STEP 1: CUSHION STITCH: The beauty of the Cushion Stitch is the extra height it offers. Place one stitch over four mesh on the diagonal from the top left to the bottom right hand corner. See Figure 1. You can place all 12 diagonal stitches OR you can do each one individually and then do the next step. Either way would be correct. This diagonal stitch will be totally covered. This is what gives the stitch its height. Use your trolley needle. STEP 2: Following Figure 2 gently stitch over the diagonal stitch following the counting system.. Use your trolley needle. Work a total of 12 Cushion Stitches.
STEP 3 is putting the HALF SCOTCH STITCH in place. It is nestled right up beside the Cushion Stitch. Use your trolley needle. There are eleven stitches on each side of the Cushion Stitch. Follow Figure 4. **If you are an experienced stitcher you can work all three steps as you stitch.
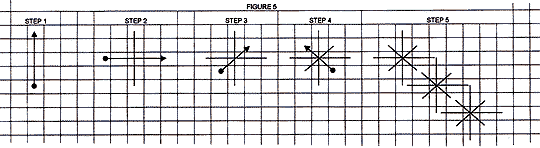
STEP 4: The DOUBLE STRAIGHT CROSS STITCH is a delightful stitch for texture. When you are working this stitch you may find that you have to angle your needle under the Half Scotch Stitch. Make sure you do not catch the thread of the stitch; it will lay gently over a small portion of the Double Straight Cross. Follow figure 5 below. Steps 1 to 4 create the stitch. Step 5 shows how each stitch locks into each other. There are 20 stitches plus two compensating stitches (see figure 6) one at each end. They are snug again the Half Scotch Stitches.
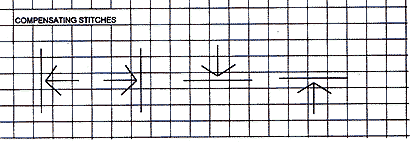
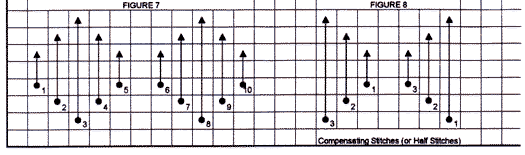
STEP 5: There are two rows of HUNGARIAN STITCH. This stitch creates a lovely flat surface which shows off the overdyes so well. Follow figure 7 carefully noting that there are two mesh between the two units. View the overall for the compensating edges and follow figure 8. Use your trolley when working this stitch. In the first row closest to the centre there are eleven whole units and two half units. The second row has nine whole units and two half units.
STEP 6 Is another row of DOUBLE STRAIGHT CROSS and it has 12 full stitches and two half stitches. View the overall design. STEP 7: This row consists of five full Cushion stitches with six Half Scotch Stitches on the inside and four Half Scotch Stitches on the outside. Use your trolley needle. View the overall design. STEP 8: Stitch another row of Double Straight Cross consisting of six full stitches and two half stitches. STEP 9: Stitch two rows of HUNGARIAN STITCH. The first row is two full stitches and two half stitches. The second row is two half stitches. Use your trolley needle.

FINISHING: read everything first before you begin to stitch.
Have a tie and some batting near by. After you have completed the first side. Put in some batting. As you come closer to the end you can add more batting and place your tie up at the point. Stitch to the corner making sure your tie is in securely. You could add a tassel in the centre or even hang it from the centre. I hope you enjoyed this little project. I would love to hear from you. Carolyn
COPYRIGHT NOTICE: None of these designs or instructions can be reproduced or distributed in any form (including electronic) without the prior written permission of Carolyn Mitchell |