A class for kids and adventurous adults
by Lois Caron
MATERIALS:
*1 skein of CARON collection thread such as Rachelette or
Watercolours (you will be able to stitch two large ornaments
with a 5 yd skein of Rachelette; you will be able to stitch 4
or 5 large ornaments with one 10 yd skein of Watercolours)
1 tapestry needle size 18 or 20
1 sheet of 7 mesh plastic canvas
*We used a variety of threads for our samples: Watercolours,
#145 Carnival; Rachel, B5 Royal Blue; Rachelette, A16 Silver
and A44 Green
OPTIONAL MATERIALS
Beads and/or charms to decorate the ornaments (We used one
package of Mill Hill Pebble Beads #05161 one wreath charm and
one faerie charm)
Foil paper or felt to use as a backing for the ornaments
INTRODUCTION
There is more to embroidery than just cross stitch. This month
we will explore a fun stitch, called the leaf stitch, to make
decorations which can be used as Christmas ornaments, or which
can be pasted on greeting cards or notebooks. You could even
sew them to your jeans jacket or make suncatchers to hang in
a window.
There are many variations of the leaf stitch, but we will
stick with the basic format and play with ways to combine "leaves"
to make different shapes. We'll also see how different threads
and different colors can make the same shape look like something
really new.
You can make everything shown in this class with just one
type and color of thread, but we've tried a variety and you may
want to experiment also. The larger ornaments require about two
yards of thread and the smaller ones one yard or less. If you've
got scraps from previous projects, try them out on these designs.
SOME TIPS ON USING
OUR THREADS
Watercolours is variegated pima cotton.
There are three strands twisted together and they normally should
be separated.. For these designs, though, you can leave the thread
just as it comes. For bright, fun designs choose color combinations
with a lot of contrast. For a more realistic look (such as for
leaves) choose color tones that are closer together in value.
Rachel is a tubular nylon thread. It
can be stitched flat, like ribbon, or it can be scrunched up
to stitch on finer canvas or fabric. It can ravel, so use a large
needle and immediately cut off any ends that start to fray. Rachel
gives a shiny, wet look to your stitching.
Rachelette is a tubular nylon thread
with a thin metallic threaded through it. It is thick and should
be used on canvas or fabric with big holes. Plastic canvas is
perfect. Like Rachel, it can fray, so keep an eye on the ends
and clip off any ravels before they get too big. You'll probably
also have to smooth the thread frequently since the metallic
or the nylon sometimes get longer than the other thread and they
need to be equalled out again. Rachelette adds a really nice
sparkle to your stitching. |
THE BASIC LEAF STITCH
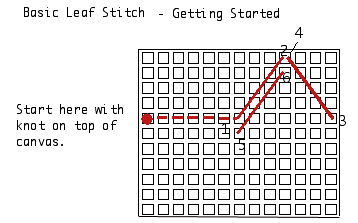
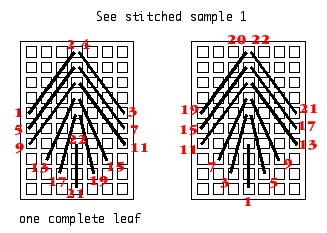
You can either start with the "top" or the "bottom"
of the leaf, so we show two different stitch sequences.
Begin by threading the yarn on a large tapestry needle and
make a knot at one end. Bring the thread from the front of the
canvas to the back, positioning the knot about 2 inches away
from the starting point of your stitching. Follow the stitch
sequence of your choice and bring the needle to the front of
the canvas on uneven numbers and bring it to the back of the
canvas on even numbers.
On our first stitched sample we have used Rachelette, A16.
We added a cross stitch and a hangar made of the same thread
at the base of the leaf. We added a faerie charm at the tip of
the leaf.
If you want to make a bunch of these, they would be pretty
on a small tabletop tree or glued on a greeting card.
COMBINING TWO LEAF STITCHES
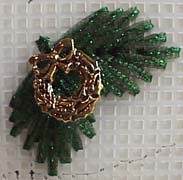
On this example we stitched two groups of leaf stitches and
placed them at right angles to one another. We added a wreath
ornament where the leaves join. Depending on the threads selected,
this could be made to look like holly leaves, or a bow. We used
Rachelette, A44 for our sample.
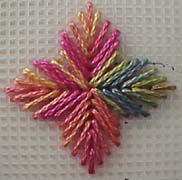
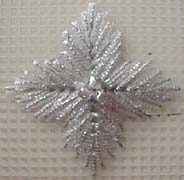
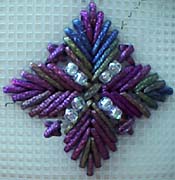
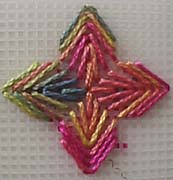
COMBINING SEVERAL LEAF STITCHES
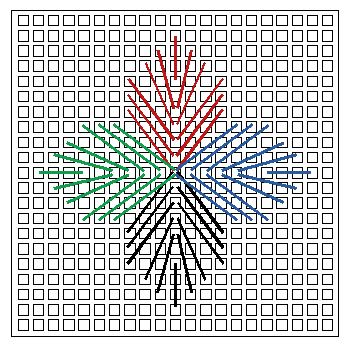
For examples 3A, 3B, 3C and 4 we have combined four groups
of leaf stitches, with each group facing in a different direction.
3A is stitched with Watercolours, Carnival (#145).
3B is stitched with Rachelette, A16. We've added three pebble
beads in the center.
3C is stitched with Rachelette, A44. This time we've arranged
pebble beads in a starburst and sewed them on top of the needlework.
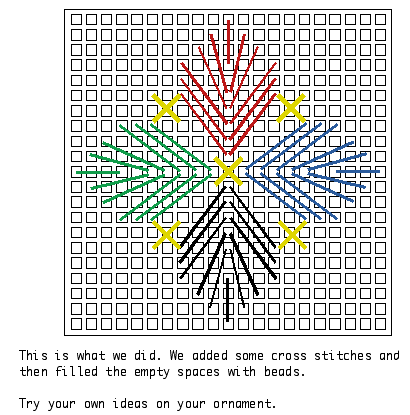
For Example 4 we did something a little different. We took
the tubular nylon thread (Rachel) in color B5. With a big blunt
needle, we threaded the Carnival Watercolours through the center
of the tube and used that to stitch the ornament. Look how different
the Carnival appears now!We also left the center hole blank,
so each leaf was moved out by one plastic canvas "thread.
Then we added some cross stitches and beads for extra decoration.
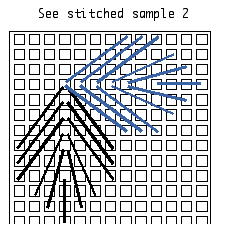
TURNING THE MOTIFS AROUND
For all of the ornaments so far, we've made sure the base
of the leaf stitch was facing toward the center of the design
and the tip to the outside. What happens if you turn the leaves
around so the tips are all facing toward the center?
Take a look at the following example, which we stitched with
the Carnival Watercolours.
FINISHING YOUR ORNAMENT
Carefully cut all around your stitched shape. Be sure to leave
one plastic canvas thread all all around the design. 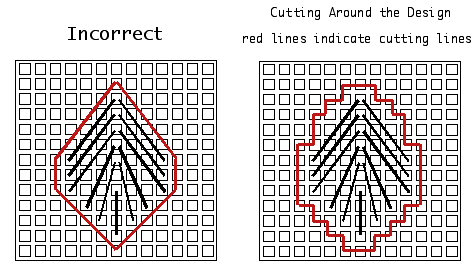
Use leftover scraps of threads to make hangars if these are
to be Christmas ornaments.
You might want to cut out felt or foil shapes to glue to the
back of the designs first.
If you wish, you can glue the ornaments to paper or fabric
for lots of other uses, such as clothing embellishment or holiday
cards.
ON YOUR OWN
I hope, by now, that you have lots of ideas of your own and
will go on to experiment with new variations.
-
- COPYRIGHT NOTICE: This pattern/chart
is provided for our visitors use only. None of these designs
or instructions can be reproduced or distributed in any form
(including electronic) without the prior written permission of
Lois Caron.