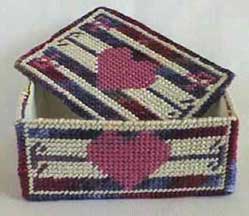
Rachel's Box
Created for The Caron Collection by Too Sisters Designs
Model Stitched by Carolyn Hotchkiss & Tisha Kuntz
Click here to learn about Too Sisters Designs
Part I of this project is to create the box top.
Part II will be featured next month
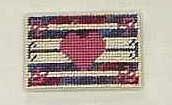
Top of Rachel's Box
Materials needed:
10-weave ("10 Mesh") plastic canvas
3 skeins 012 "Wildberries" Watercolours by Caron Collection
2 skeins B7 "Rachel" by Caron Collection
2 skeins DMC #5 Perle Cotton 000 Natural Watercolours by
Caron Collection
#20 tapestry needle
Scissors
Pre-adhesive felt, or felt and fabric glue
Click Here for Rachel's Box Charts
Step 1: Preparing the Plastic Canvas
Cut out the piece of plastic canvas needed for the design.
Cutting the piece to size before stitching makes it easier to
handle. Then you won't need to worry about cutting the wrong
places later, accidentally unraveling your work.
The size of the piece is 41 holes x 28 holes
Step 2: Stitching with Watercolours:
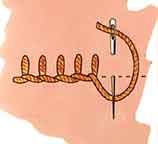
All stitches are done with Continental (or Tent) stitch.
This is what the Continental (or Tent) stitch looks like:
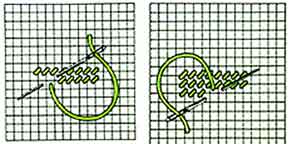
Continental or Tent Stitch
You will be using Watercolours. It comes in a three-ply length.
You will need all three strands for optimal coverage. Separate
each strand, and then carefully put them back together so the
color patterns match again. You may knot the end, or you may
leave a length (or "tail") free to be worked back under
completed stitches with the needle. Subsequent lengths may be
started by running under a few completed stitches.
The colors change as you stitch with an overdyed thread. This
gives you the chance to make a kind of pattern with your stitching.
If you stitch straight across, row-by-row, you will get long
bands of colors. If you stitch up and down in columns you will
get blocks of colors. We have chosen to stitch our model with
a diagonal pattern. We started with one stitch, and then worked
the stitch above, then to the left, as shown in the diagram below.
You may stitch however you are comfortable, because there is
no right or wrong way.
Step 3: Stitching with Rachel
Rachel is a nylon ribbon. It can ravel if care is not taken.
It is best to work with relatively short lengths, and to cut
pieces on a diagonal (as you would cut ribbon for a package).
If you have FrayCheck, put a dab on the ends to help avoid raveling.
For optimal coverage, two lengths of Rachel are needed. We found
it easiest to take a length twice as long as we wanted to work
with, fold it in half, and use it doubled. You will be using
the Continental (or Tent) stitch for all stitches.
You may want to use the "loop method" of securing
each fresh length for stitching. To use the "loop method"
do this: Thread the two loose ends of the doubled-over ribbon
through the eye of the needle. This will leave you the doubled
loop at the other end. Bring your needle up through the canvas
as if normally stitching, but do not pull it all the way through.
Bring your needle back through the canvas to complete your first
stitch. Bring the needle and fiber through the little loop still
on the underside of your stitching, and carefully draw it tight.
The loop will hold the fiber gently secure. You may then continue
stitching normally.
Step 4: Stitching with DMC Perle
For optimal coverage, it is suggested that you use two lengths
of perle cotton in the needle. Again, you will be using the Continental
(or Tent) stitch, as you stitch with DMC Perle.
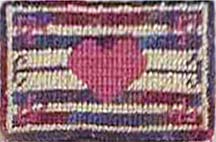
When completed, you should have a piece of stitched plastic
canvas looking like the illustration below:
Stitched Piece of Rachel's Box Top
Finishing Instructions:
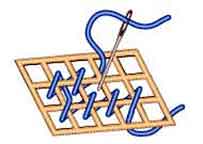
1.Edging is done with three strands (one length) of Watercolours,
using the buttonhole (or blanket) stitch.
This is what the blanket stitch looks like:
Blanket or Buttonhole Stitch
On the reverse side, secure your length of Watercolours; from
the reverse come up with the needle through the outermost hole
along the edge of the piece. Bring the threads all the way through.
Come up, again from the reverse, through the hole next to the
one you just used. This time, make sure the loose thread is below
(the side away from the edge of the canvas) the needle. Continue
in this manner, using every hole along the edge of the canvas.
You may wish to do two stitches in each corner hole, one facing
each direction.
To end a length, run through some stitches on the back. Beginning
a second length, you may want to carefully work your needle through
the crossing fiber of the final stitch of the last length. While
this isn't necessary, it does give a nicer 'finished' look to
the piece. To end the entire piece, do one last stitch in the
original starting hole and secure the excess by running through
stitches on the back.
Here is what the blanket stitch looks like, as you progress:

Rachel's Box Top is Edged with the Blanket Stitch.
This Gives it a Lovely Finished Look.
Next, fit the felt (leaving the adhesive backing on) in place,
to the bottom of your stitched piece. Use the felt oversized
and trim any excess, if needed. Remove adhesive backing (or apply
fabric glue lightly, if not using a pre-adhesive product), then
carefully apply to underside of stitched piece. Make sure to
snugly fit the felt along all edges.
Note: To reinforce the design and make it a bit stiffer, you
can cut a thin piece of cardboard about one quarter to one half
inch smaller along the edges than the design. Then cut a piece
of felt the same size as the design. Sandwich the cardboard between
the plastic canvas and the felt, then secure together with adhesive.
The cardboard will add weight and stiffness to the design.
The Completed Rachel's Box Top
Be Sure to Come Back for
Part II for the rest of the Rachel's Box Project Next Month!
Notes:
We used the colors specified in the chart for our model. You
may use any color of Watercolours, however, because we'd like
you to use your favorite colors. Choose the color you like the
best, then pick complementary colors for the Rachel and the Perle
Cotton. Your heart will then become your very own, featuring
the colors you enjoy most!
When done, your Rachel's Box Top can also be hung on its own
as a picture without a frame since the edges are all nicely finished
with stitching. Simply attach a self-adhesive hanger, or glue
a regular hanger to the back of the stitched piece. You can also
attach an easel back (available in various cardboard sizes that
can be cut to fit your design) to display it as a freestanding
decoration on a shelf, dresser, etc.
Carolyn and Tisha, the Too Sisters, have been very busy since
we last spoke with them!
Although they've been unusually quiet for the past several
months, due to their father's battle with esophageal cancer and
subsequent passing on March 20th, many new designs have been
in development. By the end of the year, their current product
line of 21 charts will almost double as they plan to add another
14 designs to the Too Sisters array.
"It's been a challenge to keep the design process in
full-swing during a huge remodeling project, as well as throughout
Daddy's illness," Carolyn said. "But now we have a
beautiful new living space that doubles as a needlework studio.
Good thing, since we basically had 50% of the house demolished
and rebuilt over the past few months!" The renovated house
signifies much more than added space for the designing duo. It
was also discovered that Tisha has a hidden talent for interior
design. Her new company, Verdugo Hills Interiors, launched a
business association with Dan McCluskey's Crest Construction,
catapulting Too Sisters Designs into part of a full-fledged interiors
and home accessories company.
"Hey, who knew? Well, okay, the General Contractor knew,"
Tisha admitted, laughing. "You just never know what's around
the corner, which is why the needlework industry so fulfilling.
All of a sudden, the needlework design path has taken us in a very exciting direction. Wouldn't it be fun if we ended
up like Mary Engelbreit or Lynette Jennings?" In addition
to high-end interiors with very creative touches, the future
holds promise of both custom-painted furniture and accessories
lines. "We're looking forward to taking our love of bright,
bold colors into the home accessories market. It might take a
while for that to catch on, but good things will happen."
"We're not sure the world is ready for us yet,"
Carolyn said, giggling, "but they will be soon. Lois Caron
will be able to take credit for it all, too, because she gave
us our start!"
If you would like to explore how Too Sisters Designs uses
overdyed fibers in their work, here is a list of current (and
forthcoming) charts featuring products from The Caron Collection:
"North by Loch Ness" - winner of the Nautical Themed
contest by The Caron Collection at:
http://www.caron-net.com/galleryfiles/galjuly.html
"Friendship Hearts"
"Barb's Batik"
"Ho Ho Ho"
"Happy Hearts"
Too Sisters' Online Classes and Designs Featured
on The Caron Collection website include:
"Tulip
Trio" at http://www.caron-net.com/mar99files/mar99cla.html
"Winged Wonder" at http://www.caron-net.com/july00files/jul00dch1.html
"Rachel's Box"
For a special Designer Spotlight featuring Tisha and Carolyn
and Too Sisters Designs go to:
http://www.caron-net.com/july00files/jul00des.html
To learn more, contact the ladies at:
Too Sisters Designs
http://www.toosisters.com
Post Office Box 10843
Burbank, CA 91510
(818) 559-6567
CLICK HERE TO GET BACK TO KID'S PROJECT
COPYRIGHT NOTICE: No part of these instructions/project
nor the included diagrams/illustrations can be reproduced or
distributed in any form (including electronic) or used as a teaching
tool without the prior written permission of the CARON Collection
Ltd. One-time reproduction privileges provided to our web site
visitors for and limited to personal use only.
