Dyed and Gone to Heaven – An Online Magazine and Needlework Resource
Sampler Bookmark!
Design and Instructions by Rita Vainius
Since this month we are celebrating some of the pioneers in the needlework field, we thought it might be nice to present a kids' project that is a little more advanced and that could be completed with your grandmother, or whoever in your family taught you what you know, or want to learn, about needlework. Our aim is to thank those women and men who are keeping these skills alive by passing on their knowledge and love of needlework to the next generation. One suggestion for this project is that each of you make your bookmark for the other person. This can be an opportunity to spend some special time together and will result in a beautiful gift for each of you when completed. Here goes!
Materials you will need:1 Skein each of Watercolours Tahiti and Deep Sunset1 Piece 11 ct. Cross Stitch Fabric at least 6" by 13", preferably in white1 Pair Scissors1 Package Iron-on Mending Tape " to 3/4" wide1 Package Mending Tape 1" to 1 1/4" wide (or you can just get the wider tape and cut it narrower later)1 Needle to fit 1 strand of Watercolours Thread1 Needle to fit 3 strands of Watercolours Thread
Note: For beginners we suggest you use a looser weave canvas and all three strands of the Watercolours thread together, as it comes on the skein, to make this project. This will make it a bit easier for newcomers to cross stitch.
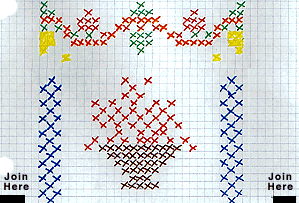
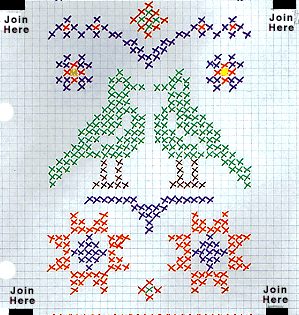
The first thing to do is to print out 2 different charts: the Pattern Design for the bookmark and the Color Code chart. Now you're all set to begin. (If you do not have a color printer, you may want to print out the pattern and then make "x's" over the ones on the chart with your own markers in corresponding colors)
Step 1 - Cut a piece of the cross stitch fabric to approximately 5" by 12".
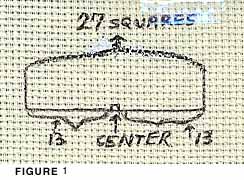
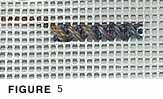
Step 2 - The actual design will span 27 spaces (or squares) on your fabric. One "X" on your design chart will represent 1 cross stitch in 1 box (or square) on your fabric. (Figure 1)
Step 3 - Never knot your thread! When you are beginning with a new thread, leave about 1" tail at the back of the fabric on your first stitch. Hold this thread in place with your finger as you start making your stitches. The stitches should overlap the tail in back and hold it in place as you stitch. (Figure 2)
]


Step 4 - Thread your smaller needle with 1 strand of the Watercolours thread in Tahiti. This will be used to start at the top of the design. Watercolours is a 3 ply (or 3 strand) thread. Separate these 3 strands so that you have three individual strands to work with (Figure 3). Find the center of the canvas by folding it in half lengthwise. Mark this spot at the bottom of your fabric. Then count out 13 squares to the left of this center and mark that at the top. Then count out 13 squares to your right and mark that spot at the top as well. This will give you a total of 27 squares or individual cross stitches which will be the width of your design. (Figure 1)Step 5 - Following the chart pattern at the top, going from left to right and using 1 strand of the Tahiti thread, you have a first row of 3 cross stitches. Since these stitches are relatively far apart, I have completed each cross stitch individually, rather than carrying the thread across the back of the canvas to the next stitch. In most of the pattern where the stitches are closer together, we will use the method most stitchers use for cross stitch, making only one half of the "x" of each cross stitch across the row, from left to right (Figure 4), and completing the other half of the cross stitch, going from right to left in the same row. (Figure 5) Keeping Step 3 in mind whenever you start a new thread, bring your needle and thread from the back of the fabric to the front at the space on your canvas that corresponds to the first "x" on the chart. (You might want to practice a few stitches on a scrap of canvas before you start on the bookmark.) You will be making a cross stitch in space #1 (first space), space # 27 (last space), and space #14 (middle space).
Step 6 - When finishing with a particular piece of thread, bring the thread to the back of the canvas, on the last stitch you are making with that thread, and secure the thread by running it under the stitches on the back, the way you hold the thread in place on the back of the canvas when you start a new thread. (Figure 2) Then cut off the excess.
Note: The Watercolours threads are variegated, which means that they change colors in the same skein many times and the colors blend and change with each color variation. You can complete the design shown by just alternating the two colors used, Tahiti and Deep Sunset, changing from one to the other as the pattern design changes. For instance: start the topmost design pattern in Tahiti, (the first 8 rows), and then switch to Deep Sunset for the basket of berries and the border design on either side of it. Then switch back to Tahiti for the pattern between the basket and the birds and so on. Or you can do what I did and "cut out" individual colors in the skein and be more controlled and specific with the colors you use in the design. When you use variegated yarn, even if you "cut out" a colour, that strand will not be exactly all one color, but will vary in color tone at each end where the color begins to change. If you want to stitch the pattern this way, use the color code as a guide to the different color "x's" marked on the chart. Referring to the finished bookmark, I used the green thread changing into the wine colored thread from the Deep Sunset skein, thus using 2 color changes for the birds. In the star shaped designs under the birds I used only the orange-yellow part of the Tahiti strand for the outside and the light purplish color in Tahiti skein for the center of the stars. Once you get comfortable with stitching and following the pattern chart you may want to decide the colors you want to use in the pattern, which may be different from mine. Feel free to do this to personalize the design or just experiment with the colors!

Step 7 - Follow the pattern chart and color code to work the rest of the pattern, continuing to work from top to bottom and from left to right as you stitch.
Step 8 - When the stitching on the bookmark is completed, trim any extra fabric on all sides to approximately 1 ."
Step 9 - Read the ironing instructions on the mending tape. Then iron the bookmark flat to get all creases out. Fold over the left side of the fabric toward the back leaving about 1/4" to " of white border to show in front beyond the stitched design. Iron the fold to flatten. Place the bookmark face down and using the iron and the narrower mending tape, place the tape so that of it covers the back of the bookmark and that of it covers the fabric you have folded over from the front and iron it according to the directions on the mending tape package. Repeat this procedure with the right side.
Step 10 - To fold over the bottom, place the bookmark face down, make a triangle at each corner and fold it in toward the center of the bookmark. (Like you would do with the paper on the ends of a present you are gift wrapping) .
Step 11 - Iron the corner triangles down flat. Fold up the bottom part of the bookmark and iron to flatten.
Step 12 - Using the wider mending tape iron it over the fold at the bottom and back of the bookmark overlapping both. Repeat Steps 11 and 12 with the top part of the bookmark.
Your bookmark is now ready to give to Grandma or to some other special someone. Every time you see it, it will bring back fun memories of doing this project together with someone you love.
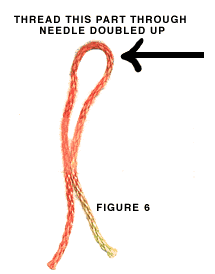
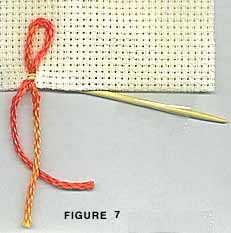
Step 13 - This is optional. If you want to embellish your bookmark even further, you can add some fringes at the bottom. Pick whatever color you like the best but do not separate the 3 strands. You will be using the Watercolours thread as-is. Cut approximately 12 pieces of thread about 5" long. Using the needle with the larger eye, fold one piece of the thread in , and thread the looped part of the thread through the needle. (Figure 6) Then putting the needle through the front of the bookmark, under the completed design, in the very last or second to last row of the fabric before the fold you made at the bottom, pull it through to the back of the fabric. (Figure 7)
Step 14 - After you have pulled the thread through to the back, remove the needle and place the 2 loose ends of threads through the loop coming out the back of the fabric. (Figure 8)----------
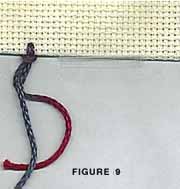
Step 15 - Pull the loose threads to tighten the loop close to the edge of the fabric. (Figure 9) This is your first fringe. Continue Steps 13, 14 and 15 along the bottom making a fringe at every 2nd or third square. When you have added all the fringes you want, trim them so they are all a somewhat even length.
Super! Now to actually use your bookmark, you will have to read a book! So go ahead and pick a good one. Maybe you and Grandma can read the same book by taking turns and reading out loud to each other!
This project is more difficult than previous ones so try to do it with the help of someone experienced in needlework and take your time. It's not something that can be completed in one day or maybe even one week, but it will be very satisfying when you do. I hope you stick with it! Good Luck!
COPYRIGHT NOTICE: No part of these instructions/project nor the included diagrams/illustrations can be reproduced or distributed in any form (including electronic) or used as a teaching tool without the prior written permission of the CARON Collection Ltd. One time reproduction privileges provided to our web site visitors for and limited to personal use only.
© 1997 The Caron Collection / Voice: (203) 381-9999, Fax: 203 381-9003
CARON email: [email protected]