 Presenting
our kids project this month is David Huber, one of our contest entries
and at 10 years old certainly the youngest. Seeing the wonderful things
his mother was doing in needlework inspired him to try his own "hands"
at it. He started by trying out needlepoint on plastic canvas and beading
on perforated paper, but for his own first design attempt he chose cross
stitch. David has other artistic accomplishments to his credit: he sings
in the school choir (they just completed their season with a performance
at a rehabilitation hospital), and he recently acted the lead character
of Teddy Roosevelt in a school play. He plans to continue all three pursuits.
Presenting
our kids project this month is David Huber, one of our contest entries
and at 10 years old certainly the youngest. Seeing the wonderful things
his mother was doing in needlework inspired him to try his own "hands"
at it. He started by trying out needlepoint on plastic canvas and beading
on perforated paper, but for his own first design attempt he chose cross
stitch. David has other artistic accomplishments to his credit: he sings
in the school choir (they just completed their season with a performance
at a rehabilitation hospital), and he recently acted the lead character
of Teddy Roosevelt in a school play. He plans to continue all three pursuits.
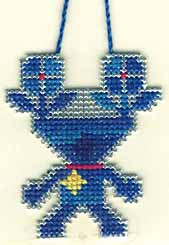
David's original design entry is entitled "Alien Creature with Flower
Eye Stalks". The name is quite as original as the finished piece.
The pattern is combination of his active imagination and his interest in
the concept of aliens from outer space. That he lives in Houston, Texas
near the Johnson Space Center may have been a factor in his choice of subject
matter. With uncharacteristic real world savvy uncommon for a fifth grader,
David thought doing an alien critter in cross stitch would be a novel design
theme which might help his piece stand out and be picked as a winning entry.
Well he was right! We think David will definitely "go far" and
do it on his own terms.
His future aspirations include working as a zoo keeper or veterinarian
(with more familiar earthbound creatures!). He currently cares for 3 pets:
a dog named Jesse and two gerbils: Midnight and Fidget. Davids's friends
and classmates think his needlework hobby is "pretty cool" and
were suitably amazed at the display of his contest entry on this website.
HOW TO DO CROSS STITCH
(We also have a special section under Tips and Guides which illustrates
how to do cross stitch if you would like further instruction.)
1. Begin by knotting your thread at one end. Thread your needle and
bring the thread from the front of the perforated paper to the back about
2 inches away from the place you want to start stitching. Be sure that
the thread on the back will be covered by the stitches you are going to
make. See Diagram 1.
2. Rows of cross stitch are worked in two trips. Begin at the left side
of your design and work one half of the cross stitch all the way across
to the right side of the row. As you stitch you will be securing the thread
on the back so when you get to the knot on the front of your work, you
can carefully cut it off. All of the stitches on the front of your work
will be slanted, but on the back they will stand straight up and down.
See Diagram 2.
3. Now go back and cross each of the stitches in the opposite direction.
See Diagram 3. Your stitches will still be straight up and down on the
back of your work.

4. When you are stitching from a chart, each square represents one cross
stitch and the symbol in the square represents the color of thread which
should be used for that stitch. A cross stitch can be made over one intersection
of threads, as you will do for this design. This is the way you would make
a cross stitch on Aida cloth, too. (Diagram 5).
On some fabrics, though, cross stitches are made over two threads, so
always read the directions when you begin a new design.
5. TIP - You must be very careful to count the number of stitches
accurately. Sometimes it helps to color in the squares as you go so you
can keep your place more easily.
6.TIP - When you come to a place where another color is needed,
end your thread by sliding it under the completed stitches on the back.
Start the new color by sliding the tail of the thread under already completed
stitches of the first color. If the space where the new color belongs is
very small, you will need to end the new color the same way, but always
try to keep the back of your work just as neat as the front.
7. After you have finished all of your stitching, carefully cut away
the extra paper from the around the design. Be sure the leave at least
one paper "thread" all around. When shapes become complicated,
such as the area around the eye stalks, simplify the shape and leave a
little extra perforated paper around the narrow areas of the design to
give it more strength.
COPYRIGHT NOTICE: No part of these instructions/project nor the included diagrams/illustrations
can be reproduced or distributed in any form (including electronic) or
used as a teaching tool without the prior written permission of the CARON
Collection Ltd. One time reproduction privileges provided to our web site
visitors for and limited to personal use only.