One of the most inexpensive, fun and extremely versatile "tools
of the trade" for kids interested in doing needlework, is
the time tested Knitting Knobby. This simple, yet functional
tool, has been around for generations and can be made of cardboard,
wood or plastic. Our kids project this month uses a plastic knitting
knobby to complete an easy first project: a set of spiral multicolored
coasters, somewhat reminiscent of the large pinwheel lollipops
sold at circuses and fairs.
MATERIALS you will need
to get started:
1 Knitting Knobby with needle- simple plastic ones
are available at most craft and hobby shops
Watercolours Threads - 2 Skeins each of Tropical
Seas and Nefertiti (this will make a pair of coasters.
If you're only making one, you will need 2 skeins of only one
color)
1 blunt-edged needle with an eye big enough for one
ply (one strand) of the Watercolours thread to fit through
1 smaller needle to accommodate beads and thread for
embellishments (optional)
scissors
2 sheets either Foamfastic or thin corkboard, approximately
5" x 5" (these are available at most craft and hobby
stores. They are optional and are being used to line the coasters
on the bottom, so that they stay in place more easily when being
used. If you are making only one coaster, you will need only
one piece measuring 5" x 5")
Some decorations, such as beads or fabric flowers (these
are also optional, to be used if you prefer to make the coasters
"fancier")
Elmers, Duco Cement or some other all purpose glue
Instructions:
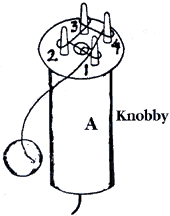
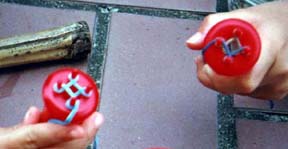
1. Put the end of the yarn through the hole in the top of
your Knitting Knobby, leaving about a four inch tail as shown
in the first diagram (A). Put the yarn around peg #
1, holding the knobby so that this first peg is the one that
is directly in front and closest to you. Wrap the thread coming
out of the top of the knobby over this peg, wrapping it in a clockwise direction. Then, move the thread to the peg
to the left of peg # 1 (peg #2) and wrap the thread around the
2nd peg in a COUNTER-CLOCKWISE direction (see first diagram
again). Continue following the same procedure for peg # 3 and peg # 4, as you did for the peg # 2. Now you
are ready to knit.
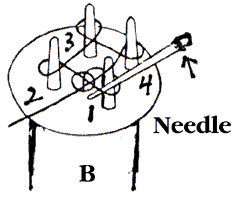
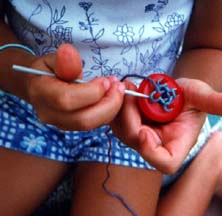
2. To begin knitting, run the thread around the outside of
the first peg (peg # 1), above the first loop that you
made on the peg. Always working from the left hand side of the
peg, put your needle in bottom loop. Pick up the bottom loop
and slip it over the top piece of thread on the same peg and
drop it right off the peg. This will leave a loop formed by the
thread that was just on top before. Pull the tail of the yarn
coming out of the bottom of the knobby to make an even stitch
by tightening the loop if it is loose. Try to keep the same tension
on each stitch that you make this way.
3. Repeat the same procedure you just used in Step 2, on the
2nd, 3rd and 4th pegs and just keep repeating. Remember to work
the loops in sequence from the peg you just worked on, to the
next peg on the left (counter-clockwise). Soon your coil of knitted
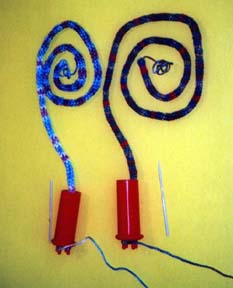
stitches will begin to appear from the bottom of the knobby.
Keep knitting until you have approximately 36 to 40 inches of
knitted coil. If you run out of thread while knitting, put the
end of the thread you have left over together with the end of
a new piece. Make a tight knot about 1/2 inch from the ends.
When you get to the knot while you are knitting, hide the knotted
part on the inside (facing the center) of the coil. This will
conceal it completely.
4. When you have the length of knitting you need (36"-
40"), take the last loop you made off of the last peg you
looped the thread over and put it on the peg to the left of it.
Then pick up the bottom loop on the peg you just put your loop
on and slip it over your last top loop and right off the peg
completely. Pull the tail of the yarn, as you have been doing
while stitching, to make this stitch even with the rest.
5. Repeat Step 4, putting the remaining loop from the peg
you last worked on, over the peg to the left of it. Keep doing
this until you have only one loop left on the last peg. Cut the
thread about 3 inches above the finished coil of knitting and
put it through the last loop left on the knitting knobby peg.
Then take the loop off the peg and pull the thread tight, making
the last loop a knot.
6. Take your piece of knitted coil and lay it flat on the
table in one length. Take one end and form the the length of
knitting into a circular shape. Do this by making one end the
center and then wrapping the rest of the coil around it in an
ever larger circle. This will be the shape of the coaster.
7. Take a piece of the same color of thread you used and cut
a piece about 18 inches long.. Then separate one strand (1 ply)
from the other two strands which make up a piece of Watercolours
thread. Thread the single strand through the blunt edged needle
and, beginning at the center of the circular shape, stitch the
coil together, connecting each successive circle of coil to the
strand before it, until you have attached all the coils into
one circular shape. That's your coaster. It is now complete and
can be used as is.
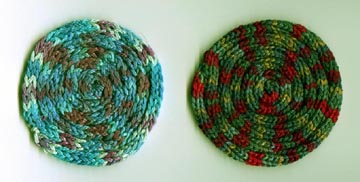
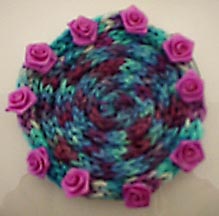
8. If you prefer, you can have some more fun by decorating
the outside edge with a row of beads or fabric flowers or some
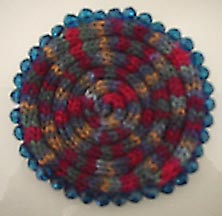
other embellishment, like the completed coasters shown. Clarissa's
coaster is decorated with a row of beads around the edge and
Therese's coaster is embellished with some delicate lavender
roses. If you do add some other decoration, remember to leave
the center part of the coaster empty, since that part needs to
be flat to be used to set a glass, vase or cup on.
9. If you wish to line your coaster so it does not slide around
on a smooth surface, place the finished coaster on top of a piece
of foamfastic or thin corkboard and with a pen or pencil, use
the edges of the coaster to make an outline of it on the backing
board. Hold the coaster in place while you do this. Then take
off the coaster and cut about 1/4 to ½ inch inside the
outline you just made. Take the glue and spread it fairly generously,
in an even coat, on the circular backing board you just cut.
Then place the coaster over it, centering the backing board underneath
so that you cannot see it when the coaster is on top. Press down
on it until the glue begins to set or place a flat heavy book
on top of it until the glue is dry. Now you have an exceptional
and very professionally completed coaster, elegant enough for
even Royalty to be served their refreshments on! Expecting
any Kings and Queens for dinner?
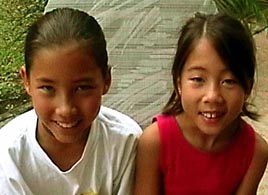
This project was completed by Therese and Clarissa Vainius who live with their parents and brother in Singapore. Previously,
they have also resided in New Jersey and in London, England.
Therese is seven years old and is in the 1st grade. She has from
a very young age exhibited a talent and interest in stitching
and has learned needlepoint, embroidery and crocheting from her
grandmother, Ellen. Ellen is an exceptionally accomplished knitter,
seamstress and embroiderer who enjoys teaching these skills to
both her granddaughters. Clarissa is nine years old and is in
4th grade. Clarissa loves doing any type of Arts and Crafts project
and is always eager to learn something new. Both sisters love
and excel in sports (especially swimming, soccer and tennis)
and music (playing the piano). Additionally, Therese and Clarissa
are exceptional students in their academic pursuits. Their older
brother, Vincent, is also a born artist and during their stay
in Singapore, has taken classes in Chinese Brush Painting, exhibiting
a natural aptitude for it. Although Vincent also made his own
coaster, along with his sisters, we are hoping to feature him
doing a different kids project on a future site. These coasters
were made during a holiday excursion to Malaysia where the family
traveled to celebrate the Chinese New Year recently.
COPYRIGHT NOTICE: No part of these instructions/project
nor the included diagrams/illustrations can be reproduced or
distributed in any form (including electronic) or used as a teaching
tool without the prior written permission of the CARON Collection
Ltd. One time reproduction privileges provided to our web site
visitors for and limited to personal use only.

 ---
---