Part I
Project by Rita Vainius
 --- ---
Materials Needed:
Scissors
Tracing Paper
Piece of muslin or plain cotton fabric approximately 10"
x 10"
Assorted Fabrics -5 or more different fabric pieces about 6"
x 6" (can be cotton, velvet, satin or brocade)
Sewing Needle one for sewing thread and one with an eye
big enough to accommodate 1 ply of Watercolours thread
Straight Pins about 8 -10
Sewing Thread
Watercolours 6 or more different shades of your choice.
You will need about 1 yd of each color using one ply (1 strand
of thread).
Satin Ribbon 1" wide (any color you like)
The wonderful thing about crazy patchwork is that there are
no rules and no mistakes! It doesn't matter what the back of
your block looks like and it's ok if your stitches aren't all
the same size or going in the same direction. So you can really
let your imagination take over!
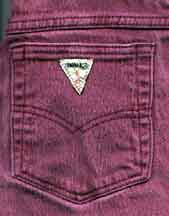
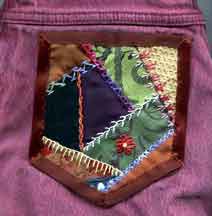
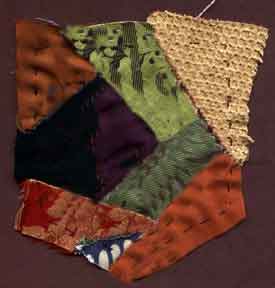
The crazy patchwork pocket shown is made for a pocket on a
pair of jeans but you can substitute a pocket on any kind of
jacket, shirt or pants instead. We will be constructing a crazy
quilt block, shaped like a pocket, on which to embroider.
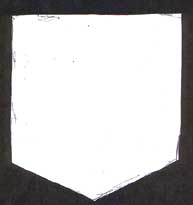
1. Place a piece of tracing paper over the pocket you wish
to make into a patchwork pocket. Using a soft pencil, trace the
outline of the pocket along the edge.
2. Cut the tracing paper into the shape of the pocket you
have traced.
3. Place your tracing over the piece of muslin or cotton and
secure with straight pins.
4. Cut your fabric about 1 1/2" inches larger than the
outside of your traced pocket shape all around. Remove the pins.
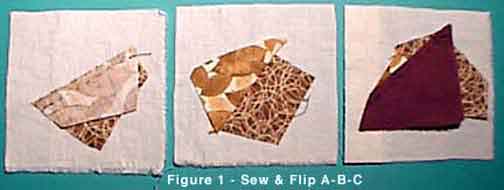
One method commonly used to construct a crazy patch block
is known as sew & flip. Begin by placing a fabric
scrap somewhere on your muslin, right side up. Cut a piece of
another fabric and place wrong side down over the first fabric,
lining up one edge. The fabric pieces do not have to be the same
size or shape. They just have to have one common edge. Sew along
this one edge, about a 1/4"in, through both fabric layers
and the muslin. Now flip the top fabric over to its' right side.
Cut a third piece of fabric with one edge long enough to cover
the first two pieces, lay it right side down, sew, and flip.
Continue until you have covered the whole muslin.
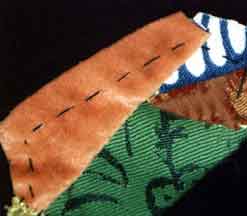
5. When all the pieces of fabric have been secured over the
muslin, flatten all the edges of the fabric along the outside
edges. Stitch a simple running stitch about 3/4 to 1 inch inside
the edge, through both layers of fabric all around the pocket
shape.
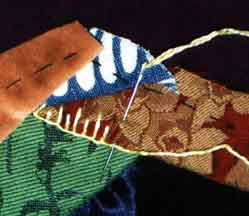
6. Thread your needle with 1 ply (1 strand) of Watercolours
thread. Using the straight stitch diagram, make a border
of straight stitches along one side of a seam, joining 2 of the
patches.
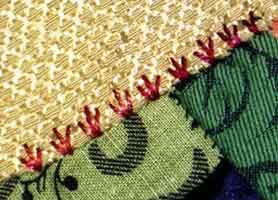 -- --
We used a grouping of 3 stitches in a "V" shape
for this. 2 stitches make up the "V" shape and then
we added a 3rd stitch in the middle of the first 2 stitches.
This stitch can be slightly longer than the other two stitches
forming the "V." Repeat with the same thread or with
a different color thread, on the other side of the seam.
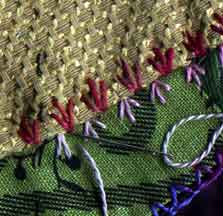
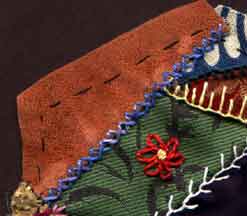
7. With a new shade of Watercolours, using the buttonhole
stitch diagram, make a series of buttonhole stitches along
one of the other seams in your patchwork. We alternated long
and short stitches for this, but you can make the stitches all
the same size or all different sizes. Remember, there are no
rules, so let loose and have fun!
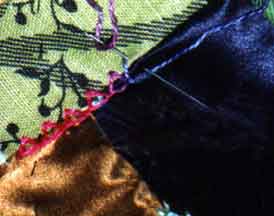
8. With a different Watercolours thread, make a series of
closed buttonhole stitches along another seam, using the closed
buttonhole stitch diagram as a guide.
9. With another color thread, make a series of cross-stitches
over the seam joining another 2 patches. Refer to the cross-stitch
diagram. Isn't this fun? And look how much more interesting
and colorful your patchwork becomes as you add different colored
threads and a variety of different stitches.
Stay Tuned for Part II, where you'll learn even more
new stitches to use that will add even more pizzazz to your Crazy
Patchwork Pocket, as it takes shape!
Kids Stitch Diagrams and Instructions
Straight Stitch - This is a single stitch, which can
be worked in a regular or an irregular manner. The stitches should
not be too long or too loose.
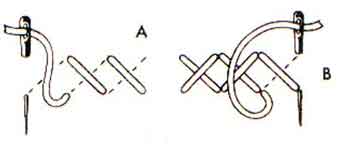
Cross Stitch Bring the needle through on the
lower right line of the cross and insert at the top of the same
line, taking a stitch through the fabric to the lower left line
(A). Continue to the end of the row in this way; on the return
journey, complete the other half of the cross (B). The top strands
of all the stitches should all point in one direction.
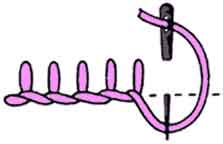
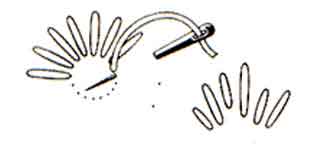
Buttonhole Stitch Bring the thread out on the
lower line, insert the needle in position on the upper line,
taking a straight downward stitch with the thread under the point
of the needle. Pull the thread up to form a loop and then repeat.
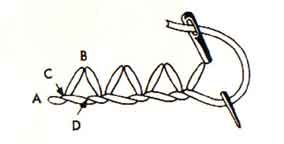
Closed Buttonhole Stitch The stitches are made
in pairs forming triangles. Bring the thread through at (A),
insert the needle at (B) and with the thread under the needle,
bring it through at (C). Insert the needle again at (B) and bring
it through at (D).
COPYRIGHT NOTICE: No part of these instructions/project
nor the included diagrams/illustrations can be reproduced or
distributed in any form (including electronic) or used as a teaching
tool without the prior written permission of the CARON Collection
Ltd. One time reproduction privileges provided to our web site
visitors for and limited to personal use only.
|
