In this class I thought it might be more instructive to you to
be able to follow the design process from start to finish. Those
of you who wish only to stitch the design as shown can skip to
the end of the instructions. But if you're interested in designing
your own work, I've included notes on my thought processes as
I proceeded with the project. Probably some of you believe that
designing can only be done by special, talented people and that
it's a magical, flawless process from start to finish. It may
be less daunting to know that it's rarely a smooth path from
beginning to end.
I thought tulips the perfect subject matter for our design.
Originally growing wild in Central Asia, they were brought to
Asia Minor by the Seljuks and adorned the palatial gardens of
Ottoman Turkey. They were one of the most popular subjects for
decoration of textiles, pottery and other objects during the
15th -17th centuries and, along with carnations, are thought
to symbolize fertility.
Click here to go directly
to the instructions,
drawings and charts
EVOLUTION OF THE DESIGN.
OBJECTIVE: Design a class piece to fit the Ottoman
Embroidery theme for May
REQUIREMENTS:
1) subject matter suitable to period. Try flowers such as
carnations or tulips which were popular tile and textile design
motifs
2) style appropriate to Ottoman Turkish decoration in fashion
during 15th-17th centuries
3) use colors typical of the time. Tile decoration was blue,
turquoise, tomato red, some ochres, white and green, sometimes
purple. Fabrics and embroideries had a wider color range, and
included much silk and metal embroidery, but reds and blues seem
to predominate.
4) design must be reasonably small and degree of difficulty
applicable to a wide audience. Instructions must fit in designated
amount of space for On-Line class. A 5" square design which
fits Sudberry House boxes would be good.
INSPIRATION:
Stylized tuip motif popular on fabrics and building tiles
of the time. See bibliography for some examples.
SELECT MATERIALS:
1) select design which fits well in 5" square. Started
with 4" design from Treasury of Turkish Designs and enlarged
to correct size.
2) select fabric/canvas with thread count which allows accurate
interpretation of design. Simplify design if necessary. (Note:
if design cannot be simplified, enlarge pattern and/or choose
a higher fabric count).
3) select colors/threads. Choose more than necessary to allow
for changes as work progresses.
PRELIMINARY SKETCHES/COMPUTER WORK:
1) Do a line drawing on paper which can be traced onto the
canvas. On a separate copy, make notes regarding colors and decorative
stitches, if any. (insert line drawing with notes)
2) For the person who knows exactly what they want and who
prefers to work from a graph, this would be the time to chart
the design, either on paper or computer. The line drawing could
be scanned into a cross stitch charting program. My finished
product rarely is exactly the same as my beginning idea, so I'll
skip this step for now.
BEGIN WORK:
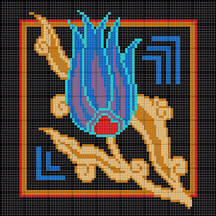
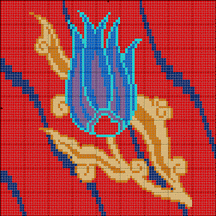
1) trace design on canvas with permanent pen.
2) stitch outline of floral motif
3) chart on computer
4) continue stitching. Whoops! The original color idea for the
petals isn't looking too great. A solid dark blue would look
better than a variegated, but try a couple of different ideas
on the computer before making a change. Deep turquoise looks
good go with that.
CONTINUE STITCHING:
1) finish stitching the motif with the new selection of colors.
2) time to decide about background. Original idea of a plain
dark blue background now seems a little boring. Try some other
possibilities on computer.
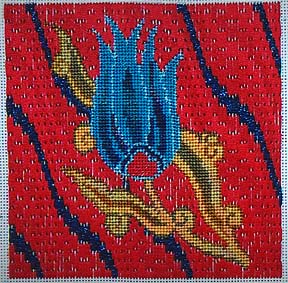
3) of the two backgrounds I like best, the red background
is more true to design styles of the Ottoman period. See if this
works in bargello. Use a variation on the design we sent shops
as a free pattern in March.
STITCH BACKGROUND:
1) Instead of just one thread for the red, I think I'd like
the play of textures if I used both silk and Impressions in the
same color.
2) Hmmm..this is looking interesting, but maybe the flower
won't show up against the red so well after all. And it may get
confusing for an inexperienced stitcher to do a lot of compensating
around the design.
3) Stitch the center panel around the flower in needlepoint
in dark blue.
4) Nope! I don't like this. Back to the drawing board!
5) After trying several more color combinations on the computer,
I think the red is best after all. Rip out the blue and go back
to the original plan. This is very difficult to compensate, however.
If I were to do this again, I would stitch the background first,
so I could more easily count out the pattern repeat.
PROJECT COMPLETE..MAYBE: Now that I've finally finished
the class piece, I've got lots of ideas for developing this pattern
further. Guess I'm going to have to find the time to do a much
larger version of this!
You'll find more ideas for developing appropriate backgrounds
in Ginger McTeague's article, The Perfect Background. Part I
appeared in April and Part II will be featured later in the year.
Check our Site Archives under Feature Articles.
We'll be featuring another approach to design in August, when
our theme will be Teamwork. We'll focus on people who take a
cooperative approach to design, in pairs or in teams.
BIBLIOGRAPHY
Akar, Azade, Treasury of Turkish Designs, Dover Publications,
NY, 1988
Humbert, Claude, Islamic Ornamental Design, Hastings House
Publishers, NY, 1980
Jenkins, Marilyn, Islamic Pottery, A Brief History, Metropolitan
Museum of Art, NY, 1983
Price, Christine, The Story of Moslem Art, E. P. Dutton
& Co., NY, 1964
Rogers, J.M. and Ward, R.M., Suleyman the Magnificent,
Tabard Press, NY, 1988

 ---
---