We
celebrate Hardanger and give a special thanks to Mary Hickmott
again for another kid's project - a pattern from her
book "Easing into Hardanger"
-
-
-
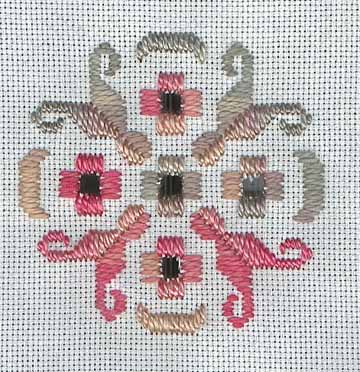
- In this embroidery
you will recognise the ship motifs from the first project; this
time in a slightly different form. These, as well as the small
crescents of counted satin stitch, are stitched in the same manner
as before.
In addition another very important element of Hardanger embroidery
is introduced - the Kloster block. -
-
Click here for the full size Chart
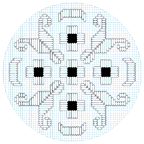
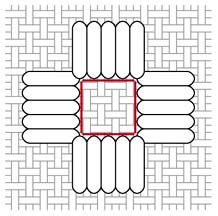
In most forms of this technique, and throughout this book, the
Kloster block consists of five counted satin stitches taken over
four threads of the fabric.
 Kloster
blocks form the outlines of motifs that have cut areas in Hardanger
embroidery. They serve to hold the threads of the uncut fabric
in place and are more efficient at this purpose than it might
seem. Kloster
blocks form the outlines of motifs that have cut areas in Hardanger
embroidery. They serve to hold the threads of the uncut fabric
in place and are more efficient at this purpose than it might
seem.
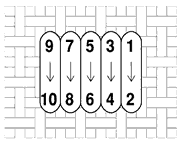
It is important that the stitches forming the Kloster blocks
are always taken down into the area that is going to be cut.
Think of them as a set of `teeth' biting into the area as, although
they themselves do not, of course, actually cut the fabric, you
will be cutting against them later. By thinking this way you
will always ensure that there are no loose stitches at the corners
or diagonal passes across from one block to another at the back
of the work. In fact by working in the order shown you can rest
in the knowledge that the reverse side of the embroidery will
be looking after itself. -
-

-
-
To work this design
you will need...
White 22 count Hardanger fabric 6 ins (15 cms) square.
Tapestry needle size 22
One skein of white Pearl cotton no 5. |
Instructions
1. Find the centre of the fabric by lightly folding it in half
each way.
2. To work the first Kloster block you will need to bring your
needle up in a position six fabric threads above and two to the
right of centre. You can use a waste knot to fasten on but in
this case it will be necessary to make this far enough away from
the starting point so that, when the knot is cut away, the thread
can be re-threaded into the needle to fasten off securely through
the stitches at the back of the work.
3. Work the central Kloster block.
4. Continue to work the other Kloster blocks (follow the sequence
carefully) and all the counted satin stitch motifs. -
 ------- -------
Tips for neat work
Always complete all surface stitching before making any cuts
in the fabric.
Always be sure to have sufficient thread to complete a block
of five stitches. Do not change thread in the middle of a block.
Fasten threads on and off through the `channels' that form at
the back of the work.
- Cut as close to the embroidery threads as you dare but do
not worry if there are small tufts of thread left. In practice
these will tend to disappear into the blocks as the embroidery
is handled and can always be trimmed later with the points of
your scissors if you wish.
-
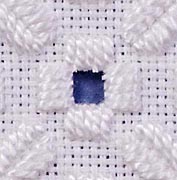
Cutting threads
This is always rather a traumatic step the first time you take
it! Just remember that you are actually far more likely to do
it right than wrong.
With Kloster blocks of the size used in this book, all cuts are
of four fabric threads and are always taken against the `teeth'
of a block, never alongside the length of a stitch. The red lines
on the diagram show where the cuts should be taken.
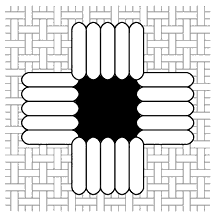
- Cut the five holes within the Kloster blocks as shown on
the main chart and the embroidery is complete. Press and finish
as for the first project.
-
-
Mounting into cards
Place the embroidery face up on a clean surface and test the
position of the card over it. Open out the card and either run
a trail of craft glue or place double sided sticky tape around
the inside of the window. Turn the card over, check that it is
the right way round and gently lower it into position on the
embroidery. Inside the flap that will fold behind the window,
run a trail of glue or double sided sticky tape around the edge
and fold into place.
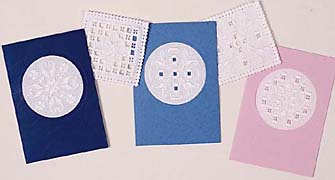
- The cards used in these three projects have a circular aperture
just over 3 ins (8 cms) in diameter and are from The Sewing Basket,
4 Edinburgh Road, Formby, Liverpool, Merseyside L37 6EP.
-
- COPYRIGHT NOTICE: This pattern/chart
is provided for our visitors use only. None of these designs
or instructions can be reproduced or distributed in any form
(including electronic) without the prior written permission of
Mary Hickmott.
COPYRIGHT NOTICE: No part of these instructions/project
nor the included diagrams/illustrations can be reproduced or
distributed in any form (including electronic) or used as a teaching
tool without the prior written permission of the CARON Collection
Ltd. One time reproduction privileges provided to our web site
visitors for and limited to personal use only.
|
