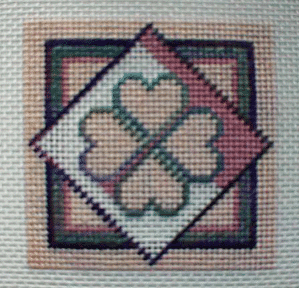
CLICK HERE FOR INSTRUCTIONS, DIAGRAMS AND CHARTS
STITCHING THE DESIGN
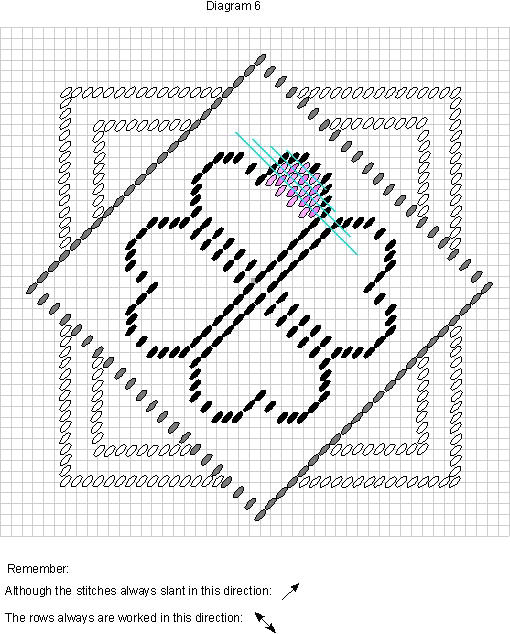
Step 6. Basketweave working within a regular shape and around
an irregular shape. Symbol on Chart: blank
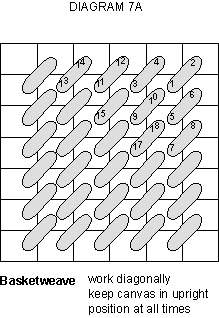
This stitch is also sometimes called diagonal tent. Use two
strands of Impressions. Start stitching at either the top point
or the far right point of the diamond, working in diagonal rows
as diagrammed in the following charts. See the special section
about Working with the Grain of the Canvas if you feel that you
are advanced enough to tackle another concept at this point.
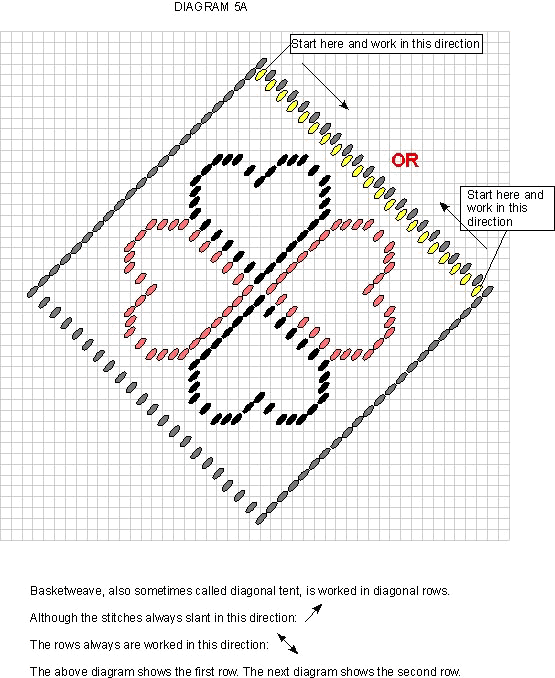
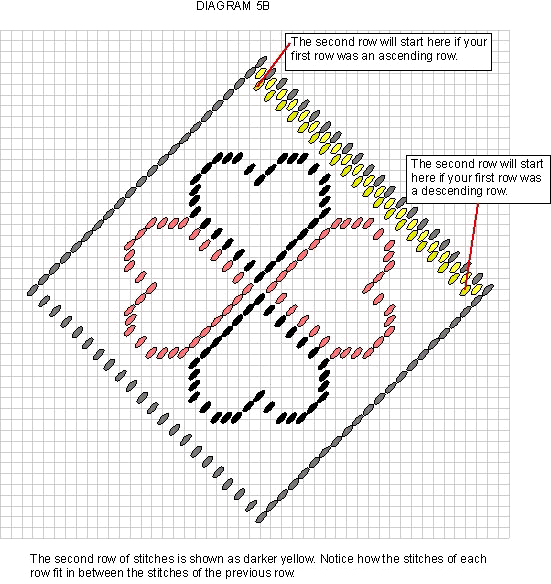
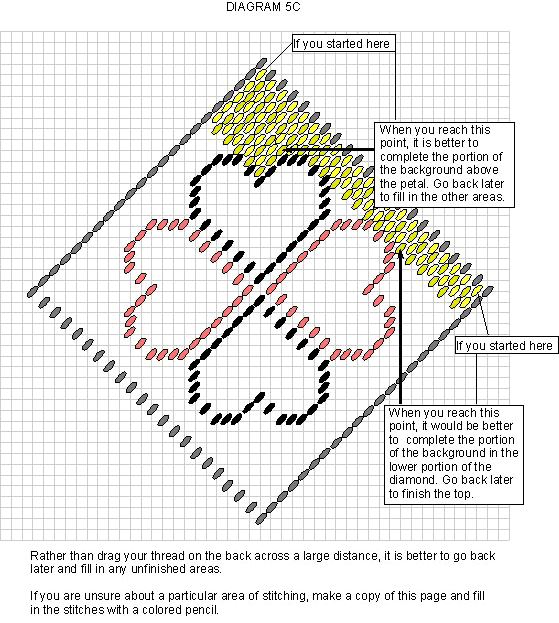
When you reach the outlines of the flower petals, you will
need to make a decision whether or not to "drag your thread.
As a general rule of thumb, if the distance you must skip in
order to continue the line of stitching is very short, it is
OK to "drag your thread across the back of the canvas or
run it under existing stitches. If it is more than about , however,
it is better to leave an area unstitched and go back and finish
it later. It is in this type of situation where knowing how to
"read the grain of the canvas can make a difference in the
professionalism of the finished piece.
Step 7. Basketweave working within an enclosed regular shape.
Symbol on Chart: blank
With six plies of Waterlilies, fill in the heart shapes which
make the flower design. To minimize the striated effect caused
by working variegated theads in a linear fashion, arrange your
six plies this way: take three separate cuts of yarn. Remove
two plies from each one. Reverse the two plies in each set; then
put all six together smoothly.
Complete the stitching in each heart before beginning another
one. Start at the point in each shape which is the farthest to
the right and closest to the top of the canvas. Because the heart
shapes are rotated in the design, the temptation will be to turn
your canvas also, but keep your canvas upright at all times.
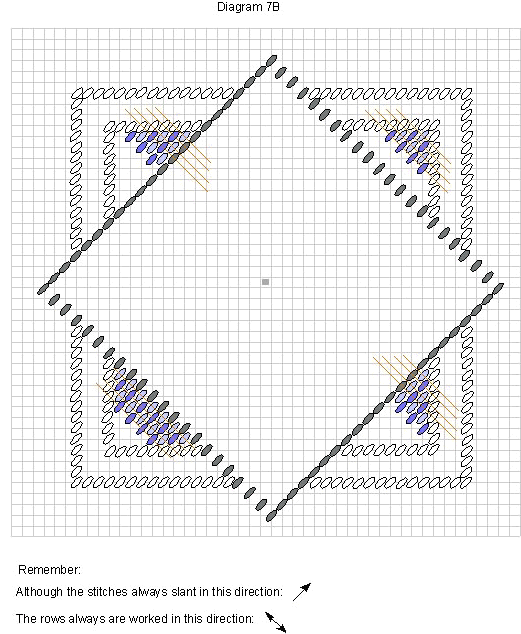
Step 8. Starting in a corner: Symbol on Chart: X
Take two plies of Watercolours again, matched or unmatched,
and fill in the small triangular areas between the border and
the diamond shapes with basketweave. Start with the shape in
the upper right. Your first row will be only one stitch, the
next row will be two stitches and so on.
As you stitch, notice than when you finishe one diagonal row
and start the next diagonal row, on the straight edges you must
always work two stitches adjacent to one another. This is often
a difficult concept for beginners. The outline you already stitched
around this area will help you to see if you miss any stitches.
The other three corners will give you practice starting and
working in different shapes.
Step 9. Basketweave background without outer boundaries.
Symbol on Chart: grayed area
You should now be comfortable doing basketweave in practically
any situation. Your final task is to make your design a square
by filling in the background around the outside of the stitched
area. Use six plies of Waterlilies and begin just as you did
in the first corner in Step 8. You will not have a stitched outline
to guide you, but you should be confident enough to give this
a try now. Don,t forget! Since you are creating straight edges,
you will always do two stitches side by side at the beginning
and ends of rows.
Once your design is completed, remove it from the frame, block
it if necessary and finish as a boxtop, ornament or small framed
piece.
FREQUENTLY ASKED QUESTIONS
How do I decide when I should use half-cross, continental
or basketweave?
Half Cross, Continental and Basketweave (Diagonal Tent) are
all basic needlepoint stitches which look essentially the same
on the front of the canvas, but which are each executed in a
slightly different manner, as you have already learned.
Half cross is just like half cross stitch worked over one
thread when doing cross stitch. It is worked from left to right
and the canvas must be turned upside down for every other row.
It forms upright stitches on the back of the canvas like on fabric.
It uses the least amount of yarn and is, therefore, the most
economical form of needlepoint. Because of it,s poor coverage
on the reverse side, however, it is not sturdy and should not
be used for items which will receive a lot of wear.
Continental is worked in horizontal rows from right to left
and gives more coverage on the back of the canvas. It, too, requires
that the canvas be turned upside down for each row. This stitch
distorts the canvas badly, especially if your stitch tension
is tight. It should never be used for an entire piece of needlepoint,
as it is very difficult to block the finished piece back into
proper shape. Even though some people claim that Continental
Stitch and Basketweave are indistinguishable, Continental has
a distinct horizontal look and is easily recognized by the trained
eye.
Unfortunately, most commercial kits only provide enough yarn
for either half cross or continental stitches. Whenever possible,
however, only use continental stitch for outlines or for stitching
very small areas.
Basketweave is worked in diagonal rows. It gives the most
coverage on the back of the canvas, making a much sturdier, longer
wearing piece of embroidery for cushions, seat covers, upholstery,
handbags, belts, etc. After several rows of stitching, a basketweave
effect is created on the reverse side of the canvas, hence it,s
name. Basketweave distorts the canvas far less than half cross
or continental and most designs can be worked without turning
the canvas. If the design is worked on a frame, very often small
pieces will need little or no blocking.
Basketweave uses the most yarn, making it sturdier needlepoint,
but also making it the more expensive way to do needlepoint.
How do I tell the grain of the canvas and why is it important?
When you are holding a piece of canvas in the proper direction,
the vertical threads will be the most dominant and the horizontal
threads will appear to recede. If, when you look at your canvas,
the horizontal threads seem to be dominant, turn your canvas
one quarter turn.
If you have a piece of canvas with the selvedge, it will be
easier to determine the grain of the canvas and it is handy when
planning your own designs to keep the selvedge to the left. Even
if you have a piece of canvas with no selvedge, however, careful
inspection and practice will help you to tell whether you are
holding the canvas right side up or sideways.
When doing basketweave, the "down rows should be stitched
on the vertical threads and the "up rows on the horizontal
threads. There are occasions when this is not possible, but generally
it is a handy rule to follow when deciding where to start an
area of stitching. And, if you leave your stitching for awhile,
you can always tell which direction to go when you resume.
Stitching with the grain of the canvas also helps to avoid
unsightly diagonal lines in your background, caused by stitching
two adjacent rows in the same direction.
Is a frame necessary?
Needlepoint stitched on a frame will keep its shape better
and be easier to block. When doing some types of needlepoint,
such as pulled thread work or complicated stitches, it is essential
to work on a frame, both to avoid distortion and to make it easier
to see what you are doing.
Help! I'm left handed!
Many left-handed stitchers who do a lot of cross stitch have
trained themselves to work in a right-handed manner, but there
is a simple solution if you wish to follow your natural inclination.
If you are working from a chart, turn it upside down and stitch
from the lower left corner of your canvas. Your stitches will
still slant in the same direction, but you will work them from
the upper right corner of the stitch to the lower left corner.
If you,re stitching a handpainted or printed design, keep the
design upright, but start stitching it from the lower left
corner rather than the upper right.
