Back to
Designer Page
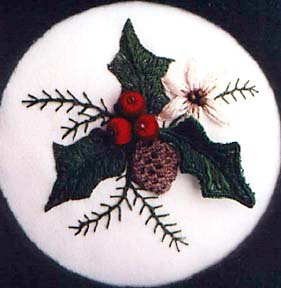
- Materials Needed
|
- 5" x 5" satin fabric
5" x 5" muslin
6" 28 guage wire
DMC® floss:
816 - red - 1 yd.
Soie Cristale®
- 5061 - Dark Green - 2 yds.
5121 - Medium Green - 1 yd.
|
Waterlilies®
23 - Cocoa - 1 yd.
78 - Pearl - 1 yd.
Mill Hill® Beads:
3 pebble beads - 5025
3 antique seed beads - 3024
3 petite seed beads - 42012 |
| Additional
Materials |
| Embroidery
hoop |
Magnifier
if desired |
Stumpwork is a raised or embossed embroidery technique from the 1890's
worked in a variety of threads to create beautiful dimensional
embroidery.
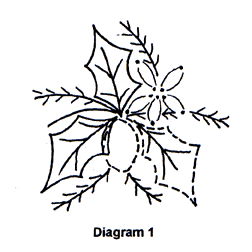
Transfer Design: The design in Diagram 1
is actual size and may be transfered by laying the fabric directly
over the design and tracing the lines with a water soluable pen.
Trace the solid lines only to the satin background fabric. These
shapes will be stitched directly on this fabric. Trace the pine
cone and leaf shapes in dashed lines onto the piece of muslin
leaving at least 1" between shapes. These shapes will be
stitched on the muslin, cut out and applied to the satin background
fabric. The berries are made from beads and will be attached
last.
Embroider the Background Fabric:
 Leaves: Work around
the edge of the leaf in long and short buttonhole stitch as in Diagram 2. Use a single strand of dark green floss (319). Bring the needle up on the edge of the leaf. Take a short stitch
into the leaf bringing the needle out on the edge very near where
the thread came out. Loop the thread under the needle and pull
through. Take a longer stitch into the leaf coming out on the
edge close to the previous stitch. Loop the thread under the
needle and pull through. Alternate these long and short stitches
making them close together so as to fill solidly next to the
edge of the leaf. Leaves: Work around
the edge of the leaf in long and short buttonhole stitch as in Diagram 2. Use a single strand of dark green floss (319). Bring the needle up on the edge of the leaf. Take a short stitch
into the leaf bringing the needle out on the edge very near where
the thread came out. Loop the thread under the needle and pull
through. Take a longer stitch into the leaf coming out on the
edge close to the previous stitch. Loop the thread under the
needle and pull through. Alternate these long and short stitches
making them close together so as to fill solidly next to the
edge of the leaf.
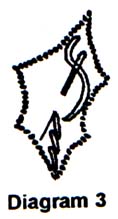 Continue to fill the leaf with 1 strand of another shade of green floss. Use straight
stitches worked from the staggered edge created by the long and
short stitches to meet at the vein line. (Dia. 2b) These staggered
stitches may be irregular to fill the shape. They help
to mix the colors and create a shaded leaf. Continue to fill the leaf with 1 strand of another shade of green floss. Use straight
stitches worked from the staggered edge created by the long and
short stitches to meet at the vein line. (Dia. 2b) These staggered
stitches may be irregular to fill the shape. They help
to mix the colors and create a shaded leaf.
Stitch the vein with 2 strands of the dark green using a stem or outline stitch. You may wish to add a few vein
lines toward the points of the leaves worked right over the long
and short stitches.
Flower: Use 2 strands of the Waterlilies®
(78 pearl) overdyed silk floss. Come up at the tip of a petal.
Go down at the other end of the petal. (Dia. 4a) Continue this
straight stitch starting and ending at the same point 15 times.
As the stitches begin to build up, encourage them to lay on either
side of the first few stitches to form the rounded petal shape.
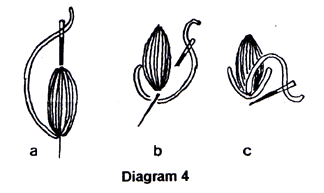
Using the same thread, work a fly stitch at the outside tip of
each petal as shown in Diagram 4b & c.
Using a single strand
of the (23 cocoa) Waterlilies®,
stitch 2 or 3 straight lines of varying lengths from the center
out on top of each petal.
Sew 3 antique brown beads
to the center of the flower.
Pine Branches: Using a single strand of the
green silk floss, work a thorn stitch over the lines indicated.
See Diagram 5.
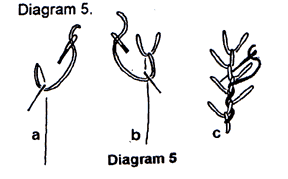
Bring the needle out at the tip of the branch. Place the needle
in to the right of the branch and back out on the stem line,
looping the thread under the tip of the needle. Now take a similar
stitch to the left of the branch. Continue in this fashion.
Whip the stem of the pine branch as shown in Diagram 5c
using the same thread. Come out at the bottom of the stem. Go
under each vertical stitch from right to left going under the
stitch only and not the fabric.
Detached Embroidery
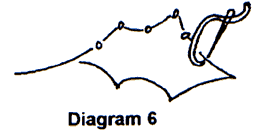
Leaf: Bend the wire into the shape of the
leaf drawn on the muslin using a needle-nosed pliers. Leave a
1" length for a "stem". Using a single strand
of the dark green floss, couch the wire in place at
approximately 1/2' intervals. (Dia. 6). Do not couch the stem!
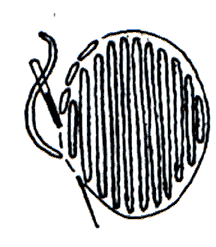
Work a buttonhole stitch with the same single thread. Make the stitches small picking
up the wire and the fabric under the wire making the loop
of the buttonhole on the outside of the leaf. (Dia. 7). Make
the stitches very close together covering the wire completely
and incorporating the couched stitches. Do not buttonhole
over the stem!
 Work the long and short stitch
just inside the buttonhole edge and
continue filling the leaf changing to another green for shading.
Work the stem and vein lines as for the leaf worked directly
on the fabric. (p. 1) Work the long and short stitch
just inside the buttonhole edge and
continue filling the leaf changing to another green for shading.
Work the stem and vein lines as for the leaf worked directly
on the fabric. (p. 1)
Pine Cone: Using 2 srands of 849 brown floss work a row of backstitching over the outline of the pine cone
on the muslin. Pad the shape with a filling of solid satin stitches
worked VERTICALLY.
Using a single strand of the cocoa (23) Waterlilies® silk
floss, work a detached corded buttonhole stitch:
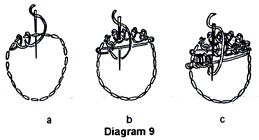
Bring the needle out at the left of the shape as shown. Make
a buttonhole stitch into 3 or 4 of the backstitches (do not go
through the fabric) at the top of the pine cone. (Dia. 9a) Take
the needle and thread under a backstitch on the right, then across
and under a backstitch on the left. (Dia. 9b) Continue to buttonhole
through the buttonhole stitches in the previous row catching
the long thread which traveled horizontally across the shape.
(Dia. 9b) Anchor in the right side under a backstitch again and
travel to the right. On this the 3rd row, make three buttonhole
stitches in each of the stitches of the previous row. (Dia. 9c)
Continue making 3 stitches in each stitch of the row before throughout
the shape. This should create a lacy filling. Only 3 or 4 groups
of buttonhole stitches are needed in a row. If there are more
than that, the filling will become too crowded. To decrease here
or more especially as the shape narrows at the bottom, skip the
first and/or last buttonhole of each row.
 Cut out pine cone leaving 3/8"
all around. Tuck under all excess fabric for padding and applique
in place on the satin background fabric using a single strand
of brown floss. Cut out pine cone leaving 3/8"
all around. Tuck under all excess fabric for padding and applique
in place on the satin background fabric using a single strand
of brown floss.
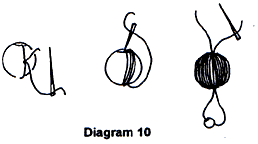
Berries: Thread a single strand of the red silk
floss in needle. Go through the hole in one of the red pebble
beads and tie the floss securely. Pull so that the knot is in
the center of the bead. Wrap the bead by passing the needle through
the center and keeping the wrappings lying neatly side by side.
(Diag. 10) When completed, travel to the side of the bead with
no tails, thread on a petite red bead and go back down through
the hole in the wrapped bead. Use the tails of the thread to
attach bead to the indicated place on the background fabric.
©Karen R. Buell
1997
COPYRIGHT NOTICE: None of these designs
or instructions can be reproduced or distributed in any form
(including electronic) without the prior written permission of
Karen Buell. Visitors are granted one time usage rights to print
out the designs for their own personal use.
|
