CLICK HERE FOR DIAGRAMS 4A,
4B, 4C and 5, 6A, 6B and 6C, 7A and 7B
MATERIALS
1 piece Zweigart Augusta 14 count cotton (Art. 7583/100/50),
25x25. Be sure there are four complete evenweave squares as shown
in Diagram 1.
5 skeins Watercolours, 166, Creamsicle
#20 or 22 tapestry needle
Sharp pointed fine scissors
Colored thread for basting center of eachevenweave square
PART II: WEAVING THE BARS AND STITCHING THE CENTER
MOTIF.
5. Weave bars. Use one ply of Watercolours.
a) Start by running the thread under the satin stitches on
the wrong side of the work. Insert the needle down in between
the middle of the four threads and work back and forth in a figure
of eight. See Diagrams 4A and 4B. Pull the thread tightly when
weaving and count how many times you weave over each bar. Repeat
this count for all bars.
b) See Diagram 4C for instructions on traveling from one bar
to another.
c) See Diagram 5 for the complete sequence of needleweaving.
When you are done, you will have four corners in each of the
five hardanger squares.
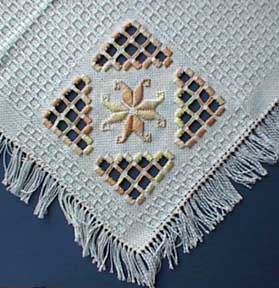
6. With 3 plies of Watercolours work the satin stitch motif
in the center of each hardanger square. Work each petal of the
motif separately, starting where the basting lines intersect
at the center of the square. See Diagrams 6A, 6B and 6C.
7. Work hem stitch all around picnic cloth, pulling tightly
at Step 3-2 both times. See Diagrams 7A and 7B.
8. Make fringe by removing threads up to the hemstitching.
Diagram 7B.
