| Dyed and Gone to Heaven – An Online Magazine and Needlework Resource |
|
 |
Back to Main Online Class Page
by Ernestine Heythaler of Victorian Dreams
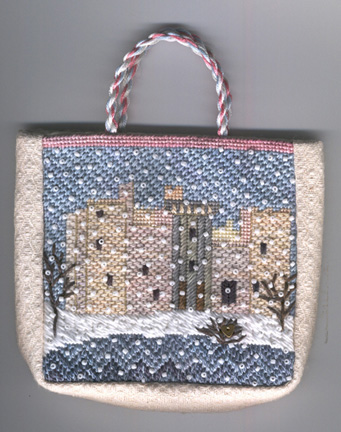
Little Shopping Bag Finished size approx. 4" x 4" MATERIALS LIST: Heart charm Threads: Caron Watercolours Caron Impressions: #0000, #1146 Caron Soie Cristale: #7055 DMC floss: #613 If doing the finishing yourself, you will need the following materials: a piece of fairly heavy fabric (light upholstery or decorator's fabric) 4 1/2" x 4 1/2" for back of bag and a piece 2" wide by 13" long for the gusset. From lining fabric, TWO pieces 4 1/2" x 4 1/2" and one piece 2" x 13". You will need about 9" of cording for the handles (make your own or buy). Directions for finishing will be given after the stitching.
DIRECTIONS: Cut canvas, tape edges with masking tape. With the permanent
marker, trace the line drawing chart onto the canvas. I put mine
up to a window, but if you have a light box, use that. Put the
stretcher bars together and staple or tack the canvas to the
stretcher bars. Area #3 The main part is worked with one strand of Granite #165. It is a diagonal over 2 threads (see diagram) EXCEPT the very center is diagonal over 3 threads. Again, put in the little windows as you stitch. At the bottom, there are two areas that are done in Copper #137 (one strand) diagonal over 2 (see diagram). These are little walls that stand out from the castle where the entrance door is. The top part of this main Area #3 is worked in tent stitch with one strand of Granite #165 with the dark, window-like areas done in Orange Blossom #096 (one strand) with one vertical stitch and then a large "X" over this. See diagram. After working Area #3, you will do the second Area #2 and the second Area #1 follow the same colors and stitches as the first areas. NOTE: Area #1 the top two rows are worked with just one strand of Orange Blossom in tent stitch. Area #4 one strand Eggshell #130 PLUS one strand Impresssions #1146 horizontal brick Area #5 one strand Natural #000 PLUS one strand Impressions #0000 horizontal brick Area #6 (three of area #6 one on right, one on left, and one on top of main tower #3) Creamsickle #166 (one strand) tent stitch Area #7 (two of Area #7- one on right and one to the left of main tower) Blush #115 (one strand) tent stitch. After working the sky and ground, backstitch with one strand of DMC #613. You will make long stitches from top to bottom along the castle sections and tack down the long stitch with the same thread. See diagram for example. Do not backstitch the outside edges of the castle. Just between each tower and to define the little sections. Look at the color photo for reference. SKY: One strand Delphinium #133 mosaic stitch (see diagram) NOTE: There are 3 rows at the top edge that are done in tent stitch in Rosebud #148 (one strand) GROUND: Snow White #100 (one strand) this is just a random stitch it is done in diagonal pattern of long and short stitches. It represents drifted snow. Just fill in the area. LAKE: One strand Polar Ice #157 PLUS two strands of Soie Cristale #7055 Bargello stitch over 3 threads, up and down 5 stitches (see diagram) TREES AND BUSH: One strand Black Forest #063 these are done in a random long and short stitch start with the main trunks I use a long stitch and then tack down the curves with the same thread. Make branches off to the sides. The bush is done the same way. Once the stitching is finished, sew a small heart charm on
the bush and sew the white beads all over for falling snow. Remove canvas from stretcher bars and block if necessary. Cut around design leaving 1/2" of blank canvas. Right sides together, stitch long (2"x13") piece of heavy fabric to canvas design. Trim the end of the long piece after sewing. Still right sides together, stitch the other side of the long strip to the back heavy square. Turn right side out. Cut the handles about 4 1/2" each (2 of them) center one on front side and one on back side (raw edges together). Stitch the lining the same as the bag, but do not turn right sides out. Slip it inside the bag with the seams inside, turn under the top edges of the bag and lining and slipstitch together. Fill with dried flowers, candy, etc. A small gift will fit (if you can bear to part with the bag). Enjoy!!
©2003 Victorian Dreams |
Please See Our ARCHIVES
for FEATURES You May Have
Missed
© 1997 The Caron Collection Ltd. / Voice: (203) 381-9999, Fax: 203 381-9003
CARON email: mail@caron-net.com / Webmaster monika@nika-net.com