Crewel
Bouquet by Mary Clubb Stitch Diagrams
Click Here to go back to Page 1 of Crewel Bouquet
STITCHES
 1.
Chain 1.
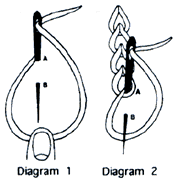
Chain
|
Worked as a solid filling, Chain Stitch is worked row next
to row, closely, side by side. The stitches should not be packed
too tightly. Rows of chain can be shaded, row by row, or can
be worked in one solid color. Begin by bringing the needle up
at "A." Form a loop by going down in exactly the same
hole and up, directly below at "B" (Diagram 1). Pull
the thread to the surface gently, forming the first chain. Repeat
as in Diagram 2, always inserting the needle into the same hole
as the thread came out of, inside the previous loop. When filling
a shape with rows of Chain Stitch, always work each row in the
same direction, beginning each new row at the top and working
downwards.
|
2. Detached Chain
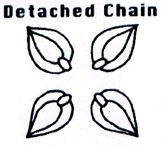
|
Make a single Chain Stitch and tie down the loop with a small
stitch. |
3. Stem Stitch
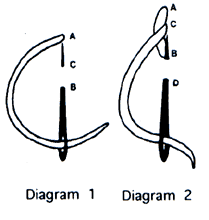
|
Stem Stitch is frequently used for stems or outlines, but
can be used as a solid filling as well. The needle comes up a
"A" and goes down at "B." Come up again at
"C," exactly half way between "A" and "B."
(Diagram 1) To continue, the needle goes down at "D"
and comes up at "B," in the same hole made by the thread
going down at "B." (Diagram 2) Continue by repeating
Diagram 2. The thread may be held on either side of the needle,
right or left, but should remain on the same side once the row
of stitches is begun.
|
4. Back Stitch
 |
Come up at "A." Go down at "B." Come up
ahead at "C." Repeat, always going back in the same
hole as the previous stitch. Keep all stitches the same length.
|
5. Buttonhole Stitch
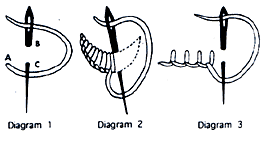
|
Bring the needle up at "A" and down at "B."
Bring up at "C," directly below "B" and in
line with "A." Thread is held under needle (Diagram
1). Pull the needle through in a downwards direction (Diagram
2). Repeat next stitch as in Diagram 3. Stitching may be spaced
as in Diagram 3 or worked closely as in Diagram 2.
|
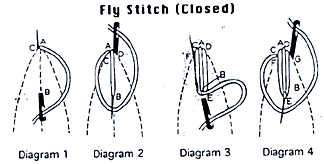
6. Fly Stitch (Closed)
|
This stitch is especially adaptable for leaf shapes. Make
a straight stitch in the center of the tip of the leaf. Come
up at "A" and go down at "B." This stitch
should be fairly long and extend slightly over the tip of the
leaf. Come up at "C," on the left side of the leaf,
close to the first stitch, but not overlapping (Diagram 1). Carry
the needle to the other side of the leaf, down at "D,"
forming a loop. Come up at "B" and tie down at "E,"
just below "B" (Diagrams 2 and 3). Continue down the
leaf. Up at "F," down at "G," forming a loop.
Tie-down by coming up at "E" and down just below (Diagram
4). Repeat to bottom of leaf.
|
7. French Knot
 |
When working a French Knot, the thread must be held taut throughout.
Bring the thread up at "A." It is then pulled to the
left and held between the left thumb and forefinger. Slip the
needle under the thread and twist one time around the needle.
The needle goes down next to the hole it came out of. Still holding
the thread taut, do not release until almost through the fabric.
|
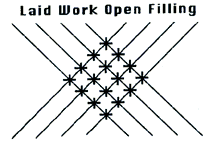
8. Laid Work Open Filling
|
Fill the designated area with long diagonal stitches, laid
at a 45 degree angle, keeping spacing between stitches even.
Lay in one direction and then lay stitches in the opposite direction.
Where long stitches cross each other, tie-down with small up-right
cross stitches.
|
Click Here to go
back to Page 1 of Crewel Bouquet
|
